Shimano Cassettes & Freehubs

|

revised by John "Ka l'Embour" Allen
| Cassettes for sale from Harris Cyclery |
|---|
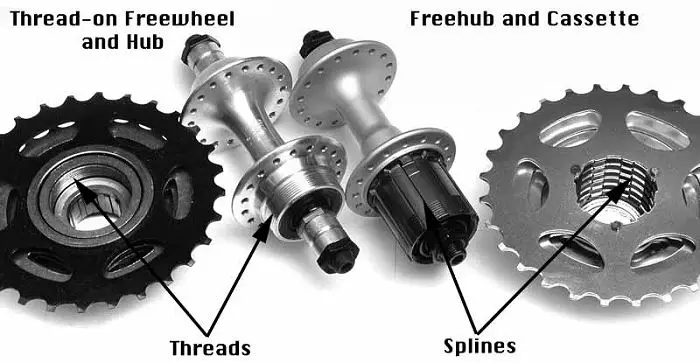
Beginning around 1980, the Shimano "Freehub" largely replaced the conventional threaded rear hub. It is sad to lose the interchangeability that formerly existed, but these hubs work so well that they have come to represent the new "standard."
If you're not sure whether your bike has a cassette Freehub or a thread-on freewheel, I have a separate illustrated article explaining how to tell them apart.
| Traditional Threaded Freewheel |
Traditional Threaded Hub |
Cassette Freehub | Cassette Cluster |
|---|
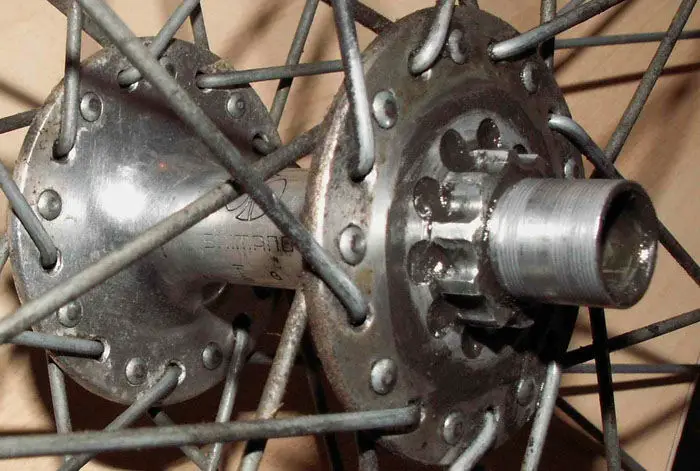
The Freehub incorporates the ratchet mechanism into the hub body (although the ratchet mechanism is still replaceable). When you wear out the sprockets on a Freehub, you replace the sprockets only, not the ratchet mechanism (which typically lasts much longer than the sprockets).
Removing a freewheel is a chore, because pedaling tightens it onto the hub threads. With a Freehub, on the other hand, once the sprockets are removed, the right hub flange is accessible for replacement of a broken spoke. There is no need to remove the ratchet mechanism.
The sprockets are commonly sold as a set, called a "cassette". Sprockets in many cassettes are held together by three small bolts or rivets for ease of installation. These bolts or rivets are by no means necessary, they just make it easier to keep the sprockets and spacers in the correct order and position when they are removed from the ratchet body. Individual sprockets are also available.
Some of the high-end cassettes use a "spider", an intermediate metal casting, to hold 2 or more of the largest sprockets. This saves weight, but sprockets that come mounted on a spider cannot be interchanged except as a complete unit.
Modern Hyperglide-type cassettes (everything made since the late 1980s) use a threaded lockring to hold the sprockets onto the splines of the Freehub body. There is a special splined tool that fits the notched hole in the lockring. Some lockring tools have a long handle, others, like the one in the photo below, have a hexagonal fitting like a nut, which can either be turned with a large wrench or clamped in a vise. The lockring has a normal right-hand thread: turn clockwise to tighten it. To remove the lockring, you need to turn it counterclockwise, but then the cassette will freewheel, so you need a chain whip to hold the cassette.
A special tool is available to remove and retighten the lockring on the road, using the bicycle's frame and chain to provide leverage. This tool is of vital importance for a bicycle tourist.
After replacing the cassette, the lockring should be tightened until it is snug, but not tightened with gorilla-like force -- especially not if it may have to be removed on the road.
 |
 |
|---|---|
| You can see the 12 spline notches inside the lockring. | Lockring tool and chain whip in place, ready to unscrew the lockring. |
| Chain Whips and Lockring Tools From Harris Cyclery |
|---|
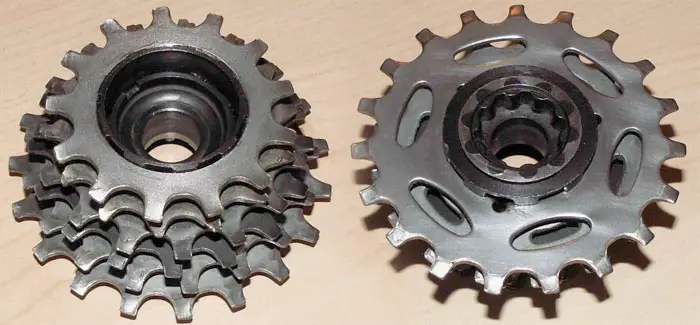
Sprockets smaller than 14 teeth used a built-in spacer, but the other splined sprockets were reversible, so that if you wore out one side, you could flip them over and the other side was just like new! Sprockets with a built-in spacer were available in 5- 6-speed or 7- 8-speed (narrower) versions.
The smallest sprocket on a Uniglide cassette was not splined, it was threaded. The threads of this sprocket would hold everything else together. Dura-Ace Freehubs used a different, smaller thread, which worked only with Dura-Ace threaded sprockets. (Formerly, you could get an 11-tooth threaded cog for Dura-Ace, but this has been discontinued.)
To remove a Uniglide cassette, you use two chain whips, one to hold the cassette, the other to unscrew the smallest sprocket. Turn the smallest sprocket counterclockwise with a chain whip, while holding the cluster from turning backwards with another chain whip.
A neat trick: it is also possible in an emergency to remove the smallest Uniglide sprocket without any special tools. This is covered in our article on repair tricks.
Uniglide cassettes are no longer available. If you have a hub that only uses Uniglide cassettes, the best thing to do is to upgrade the hub by transplanting a Hyperglide body onto it.
Alternatively, you can fit Hyperglide sprockets onto a Uniglide body by grinding or filing off the one wide spline. You'll still need a threaded Uniglide sprocket for the top-gear position. Supplies of these are getting scanty, though it is possible to grind a worn sprocket so it will work with a new chain, or use a 3/32" track sprocket -- the threading is the same, though you may have to grind down the flange or install the sprocket backward and use a spacer.
 |
|
|---|---|
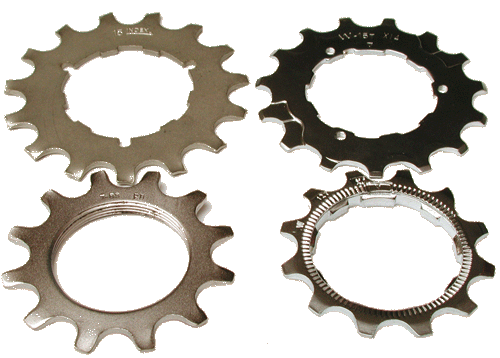
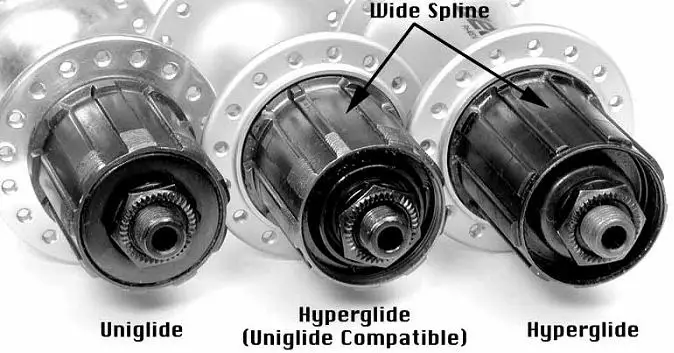
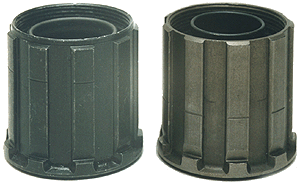
| Uniglide ® | Hyperglide ® |
 Early Hyperglide hubs had both external and internal threads, so they would work with either style of cassette. |
|
In the late '80's, Shimano introduced "Hyperglide", a new sprocket design that allows the chain to engage two adjacent sprockets simultaneously. It meshes with the new sprocket before it disengages from the old one. This results in smoother, quieter, faster shifting.
This is accomplished by shaping individual teeth differently on the same sprocket, and by forming ramps into the sides of the sprockets to facilitate downshifting.
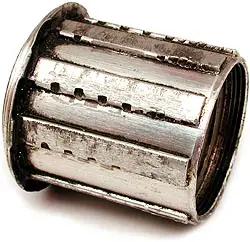
To make this work, the rotational position of each sprocket tooth must be aligned to that of the adjacent sprockets. The older "Uniglide" sprockets could be installed on the body in 9 different orientations (18 if you count the flipped-over positions!) Hyperglide sprockets only go on one way, because one of the splines (tabs) in the sprockets is wider than the others. This wide spline fits only into a matching wide groove on the Hyperglide body. There is a "^" stamped into the sprocket to help find this wide spline.
Since the rotational position of the sprocket is critical to making Hyperglide work, threaded sprockets cannot be used. All sprockets in a Hyperglide cassette are splined, and a special lockring screws into internal threads on the Freehub body to hold the set together. This lockring can use the same splined tool as is used to remove Shimano and Sachs/SRAM conventional freewheels.
A threaded Hyperglide body (or Uniglide body) can, however, be useful to avoid excessive dishing of the rear wheel on a bicycle with narrow overlocknut spacing. You install an outermost, threaded sprocket backwards (with the flange at the outside), use a spacer at its inside, and rearrange the axle spacers. There will be one fewer sprocket than usual. This is not particularly difficult, and can make good sense with a non-steel frame with a narrow overlocknut dimension that can't be changed.
People like to complain about Shimano's making things obsolete for "no reason" but that is not justified in this case. Older Uniglide splined sprockets can be used with no problem on the new bodies. Many older Hyperglide bodies also have the external threads that let you screw a Uniglide small sprocket on.
But also, most Uniglide Freehubs can be updated by installing a Hyperglide ratchet body. This is an easy and inexpensive modification (see below.)
To provide the Hyperglide functionality, each sprocket must be designed with regard to the adjacent sprockets. For instance, there are 3 different 15 tooth sprockets for 7-speed systems: one version works between a 13 and a 17; another works between a 14 and a 17; another works between a 14 and a 16.
Hyperglide cassettes are commonly sold as a unit There are dozens of different cassette combinations available. Most cassettes are designated by a one- or two-letter code.
Also, hubs marked "8-speed", "9-speed" or "10-speed" will work with any number of sprockets up to 10! (Add a 4.5 mm spacer before installing a 7-speed cassette on an 8-, 9-, or 10-speed hub, and the included 1-mm spacer before installing a 10-speed cassettes on an 8- or 9- speed hub.) Any of these cassettes will work with an 11-speed hub with the addition of another 0.85 mm spacer. 1.85 mm spacers are available so a 10-speed cassette will work on an 11-speed hub. Mavic's Shimano-compatible hubs will work with any number of sprockets up to 11, if you use the necessary spacers.
Any Shimano Hyperglide cassette with 7 through 10 sprockets will fit any Shimano Hyperglide hub with the following exceptions:
Long-cage derailers have greater takeup capacity, and work with all types of cassettes. Long-cage derailers are commonly called "mountain" derailers currently, though in the past, this style of derailer was known as a "touring" derailer. (The marketeers retired the use of "touring" as a buzzword in the late '80s when mountain bikes became the hot item.)
Note, also that most rear derailers do not care how many gears you have. You do not need to have a so-called "10-speed" derailer to use a 10-speed cassette. This is true of all Shimano derailers with the exception of 1996 and earlier (pre-9-speed) Dura-Ace units, and "Shadow" series derailers, which work only with XTR 10-speed shifters. (You also can do a minor modification to a traditional Deore MTB rear derailer, inserting the B-tension screw upsdie down> so it will work even with a 10-speed cassette that has a 36-tooth large sprocket and a non-XTR 10-speed shifter). Newer rear derailers made to take a sprocket with more teeth also will work.
"Mountain" hubs will likely be slightly better sealed against dirt and mud than "road" hubs, but this is rarely an issue in practice. The wider 135 mm spacing will generally result in a slightly stronger wheel due to reduced dishing of the spokes.
8-speed Campagnolo cassettes will not fit on newer "9-speed" and "10-speed" hubs.
9- and 10-speed Campagnolo cassettes will not fit on 8-speed hubs.
It is theoretically possible to upgrade Campagnolo 8-speed hubs with newer cassette bodies, but in practice the parts don't generally seem to be available. Reader L. Foster comments:
Which is 100% true. Easiest way to do it is to buy a 9 spd hub (easily and widely available), swap that Freehub for the Freehub from the 8Sp, then sell the (now) 8sp hub on eBay. In my case, eBay Veloce 9 hub was £25, did the swap, sold 8SpVeloce hub for £22 - i.e. cost of transaction was £3 plus some postage. Somewhat cheaper than the £75+ for an unobtainium Campagnolo 9spd Freehub. So not only is it doable, it can be done quite cheaply.
SRAM 10-speed derailers work with Campagnolo 10 speed shifters and vice versa.
Except with 11 speeds, cog spacing is different enough from Shimano's that Shimano derailers and shifters may not work well with Campagnolo cassettes, and vice versa. It is possible to fudge compatibility in some cases where cog-to-cog spacing is similar.Many replacement parts are not available for older models. Campagnolo uses a unique lockring tool. Campagnolo rear derailers are designed to work only with Campagnolo shifters; Campagnolo also changed cable pull in 2001. An after-market pulley device can bridge incompatibilities. Some manufacturers, notably IRD, Miche and American Classic, offer aftermarket replacement cassettes to fit Campagnolo hubs. There are even cassettes available with Campagnolo spacing to fit Shimano Freehubs, and vice versa. These are covered on our pages listing cassettes -- see below.
Mavic once sold cassettes with its own, different spline configuration that fits only Mavic hubs. These are rare. Mavic's Shimano-compatible hubs will work with any number of sprockets up through 11.
Shimano, Campagnolo and Mavic all use the same sprocket spacing in their 11-speed systems. A SRAM 10-speed rear derailer will work with a SRAM 11-speed road shifter. Shimano uses a different cable pull for 11 speeds than for 10, and so you must use a matched set of derailer and shifter.
Shimano Micro-spline speed bodies work only with 11- and 12-speed cassettes.
Shimano 8- 9- and 10-speed cassettes/hubs are fully interchangeable for wheels with steel Freehub bodies.
The only parts that are different in any important way between the 8- 9- and 10-speed systems are the shift control levers. (Exception: the "Shadow" series of derailers uses a different cable pull, used with "Dyna-Sys" XTR 10-speed shifters.)
The 2004-2007 and later Dura-Ace hub (FH-7800 and FH-7801) have an aluminum Freehub body with tall splines, and work only with 10-speed cassettes.
Ultegra WH-R600 complete wheels also use an aluminum body, 10-speed only. (Standard Ultegra hubs have steel Freehub bodies.)
Dura-Ace 10 cassettes have titanium sprockets 18 teeth and larger.
Shimano and Shimano-compatible 10-speed cassettes from Harris Cyclery include the new XTR 11-36T cassette, intended for MTB use but also suitable for touring and compatible with many Shimano derailers, requiring only a minor modification.
In particular, for reasons that are not quite clear, 9-speed hubs/cassettes seem to work pretty well with the opposite 9-speed derailer/shifter brand.
A wobbly cassette may result from a loose lockring, or wear of an early Uniglide hub, but there is another potential cause.
Shimano uses the trademark "Hyperglide-C" to designate a system with an 11 tooth sprocket. The "C" stands for "compact". These systems are used with smaller-than-usual chainwheel sizes, or on bicycles that have a small drive wheel, or to achieve higher gears.
Due to clearance problems, the cutaway between the splines on 11-tooth sprockets only goes halfway through the sprocket. The matching splines on Hyperglide-C bodies don't go all the way to the outer end of the body.
There are two ways around this problem:
Note, if you install an 11-tooth sprocket on an existing cassette that had a larger top gear, you must also replace the Hyperglide lockring with a Hyperglide-C lockring. The lockrings made to work with 11-tooth sprockets have a smaller outside diameter. If you use a larger lockring, the side plates of the chain will hit the edge of the lockring, and the chain will not run properly on the 11-tooth sprocket. (Hyperglide-C lockrings are compatible with 12-tooth sprockets though not always with larger ones.)
![]()
Shimano wants you to use one of its standard combinations, and offers a wide-enough choice to suit the needs of most cyclists, but you don't have to if you don't want to!
Shimano cassettes that don't use spiders have most of the sprockets held together by 3 small bolts or rivets. These are not essential. Their function is convenience, in allowing the cassette to be installed slightly more easily. To make a custom cassette, you will often need to remove the screws or rivets. Just discard them: they are unnecessary in practice.
It is not difficult to customize Shimano cassettes. If you substitute an un-approved cog, Uniglide or Hyperglide, it will still work, but the shift to/from that cog will probably not be as smooth as a Hyperglide shift normally is. Since people managed without Hyperglide for several decades, this shouldn't scare you off. In particular, if you substitute the top or bottom sprocket, you will only have one shift that isn't HG; shifts to or from the extreme sprockets tend to be less troublesome than intermediate shifts anyway.
For example, Shimano doesn't make any true "corncob" (one-tooth-jump) cassettes for time-trialists or flatland riders. In 7 speed, the closest is the J (13/14/15/16/17/19/21).
If you remove the 21-tooth sprocket from a J, you can make it into a 13-19 corncob by buying an 18 to put between the 17 and the 19. Alternately, you could make it into a 12-18 by removing the 19 and the 21, and adding a 12 and an 18.
Similar modifications can be done with other ratios. Generally, the smallest sprocket needs to have a built-in spacer, designed for the top-gear position. While you can't insert or remove a sprocket within a spider module, you can add sprockets on either side of these modules.
For example, if you want a 13-32 9-speed, you can start with a 12-27:
| Custom Cassettes for sale from Harris Cyclery |
|---|
Shimano says that you shouldn't mix I.G. and non-I.G. sprockets, but if you use one I.G. spacer per I.G. sprocket, you should be all right. Some experimentation may be required for best results with a mixed setup.
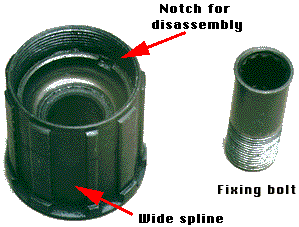
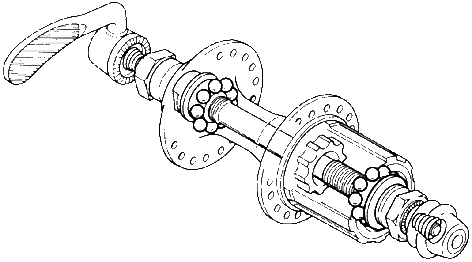
To remove some Freehub bodies (or a freewheel), the hub must be spoked into a wheel. However, the most usual kind of Shimano Freehub body can be removed from a bare hub if a cassette is installed. The fixing bolt which holds the FreeHub body can't be fully tightened when replacing the body, though, unless the hub is spoked into a wheel.
To remove the body, first remove the axle. With a bare hub, clamp the hub barrel lightly between wooden blocks in a vise, so you have both hands free, and position a chain whip to keep the cassette from turning backward.
Insert a 10 mm Allen wrench into the fixing bolt in the middle of the body. Holding the rim, or chain whip, unscrew the hollow fixing bolt (conventional right thread, counterclockwise to loosen). The body will lift off. It is secured to the hub shell by the hollow bolt and a set of splines that keep it from rotating.
The same procedure works for off-brand Freehubs that have a LH threaded fastener accessed from the LH side of the hub, too. It doesn't work with freehub bodies that screw directly into the hub shell.
But when replacing the body, you can't fully tighten the freehub bolt until the hub is built into a wheel; this requires torque in the other direction and the freewheel goes click-click-click....
Although the most common Shimano bodies are interchangeable at the hub shell, you may have further complications due to incompatibility between your right side cone and the dustcap that comes with a replacement body. The dustcaps can usually be pried out and interchanged, or you can buy an appropriate right cone to match your new ratchet body.
Older Dura-Ace bodies require a special spline wrench, Shimano tool #TL-FH10, to remove the body from the hub. See my page on Dura-Ace Interchangeability for more details on this.
Some recent hubs require 15 mm Allen wrench.
The very earliest Uniglide Freehubs, 1970s and very early '80s, used a different system, see below.
A frequent reason for body transplantation is to convert a 6- or 7-speed Freehub to use an 8-/9-/10-speed cassette. This generally will increase the over-locknut dimension. As a result you will usually need to re-dish the wheel after doing this upgrade.
Shimano lists Freehub bodies as a separate part, or you could cannibalize a hub. Wheels with damaged rims and good hubs are not hard to find.
6- and 7-speed hubs generally use 126 mm spacing, while 8-/9-speed hubs use 130 mm (road) or 135 mm (MTB/hybrid).
Some folks will tell you that you also need to install a longer axle when doing this, but that's not correct. Typical rear QR axles are 11 mm longer than the over-locknut dimension of the hub, so there's 5.5 mm of axle sticking out past the locknuts. That's way more than is actually needed. If you are converting a 126 mm OLD 7-speed Freehub (137 mm axle length) to 8 or more speeds, the OLD goes to 130 mm. That will leave you 3.5 mm of protrusion on each side, once you move the right cone over to even things out. That's plenty.
In fact, no protrusion is necessary if you use an internal-cam quick-release, but it's a convenience in wheel installation to have some protrusion. I once set up a bike with zero protrusion, where the axle was flush with the locknuts. (This was a fixed-gear with vertical dropouts, and I did it to give me a bit more chain tension adjustability.) I put a lot of hard miles on that bike and it never gave me a lick of trouble.
If you do re-space your hub, you'll also need to re-dish your wheel, because the extra space will all be added on the right side by installing the wider Freehub body. You'll need to tighten spokes on the right, possibly also loosen some on the left, to move the rim 2mm to the right so that it will once again be centered in the frame.
In going to a wider hub spacing, you'll also need to deal with the frame spacing, but this is not as difficult as you might suppose. For details on this, see my article on Frame Spacing.
If your 126 mm frame is aluminum, carbon fiber or held together by glue, you shouldn't try to spread it. That still doesn't mean that you're stuck with 7 speeds!
Any 7-speed Shimano Hyperglide Freehub will actually work with 8 or 9 sprockets, without any modification! What you need to do is to use 8 of the sprockets from a 9-speed cassette, with the 9-speed spacers -- or 9 of the sprockets from a 10-speed cassette. This trick also is useful when cassette body transplantation isn't possible -- on an off-brand hub or a Sachs 3 x 7 hybrid-gearing hub.
To make this work, you'll also need to use a 9- or 10-speed chain and shifters. Your old 7-speed derailer (except 1996 or earlier Dura-Ace) should work OK if it isn't too badly worn. Most, but not all, 9- and 10-speed shifters will work.
The limit stops on the derailer will cause the useless position on the shifter to be locked out, so this will work as a perfectly normal 8- or 9-speed rig.
Reader Justin Mohar writes:
I ran a "9 cogs of a 10 speed" set up for about a year on my road bike (having been originally inspired to give it a shot after reading Sheldon's "8 of 9" article) while waiting to build a new bike with a true 10 speed set up. I used an Ultegra 10 speed cassette (with the 4th cog and one spacer removed) on a 7-speed 105 hub. I also, of course, used 10 speed shifters (105) and chain (Dura Ace). My cranks and derailers were all 105 "7-speed," from the same group as the hub. This setup worked surprisingly well; the only issue was that shifting across the spot where the missing cog should have been was rather slow in both directions. I assume this was because the shift assist ramps on the now-next-to-each-other 3rd and 5th cogs did not line up properly, but I never really confirmed this in any way. Bottom line: it can be done. Feel free to post this info with your next update.
Justin is right about the reason for slow shifting. This issue is more acute with the narrower 10-speed inter-sprocket spacing. If instead, you remove the smallest or largest sprocket, all of the ramps will line up. Most 10-speed cassettes, and the fancier 9-speed cassettes, use a spider assembly for the larger sprockets, and so you would only be able to remove the smallest sprocket. You may need then to replace the second sprocket with one that has a built-in flange. For best shifting, this sprocket's teeth should align with those of the sprocket it replaces.
You could even have all 8 of 8 sprockets on a 7-speed body if you go to the trouble of dishing the inner sprocket -- even a 9 of 9 or 10 of 10 if you bolt the innermost sprocket to the next smaller one. Dished sprockets were at one time available from Tom Ritchie, and are available now on eBay. It also can be a do-it-yourself project. More details are here.
8-speed cassette on 7-speed body, using dished inner sprocket

 Non-Shimano Hubs
Many off-brand "Shimano type" Freehub bodies are not available, if they're even removable. Many of the off-brand hubs have the body riveted onto the hub shell.
Some "premium" off-brand hubs use aluminum bodies to save weight. This is a Bad Idea because the standard Shimano spline pattern is not designed for this material. The steel sprockets are liable to cut notches into the edges of the splines, which can make it very difficult if not impossible to remove the cassette from the damaged body.
Shown here is an aluminum body that has suffered this sort of damage. Someone has filed down the burrs to make it re-usable after a fashion.
From 2004 through 2007, Shimano used aluminum bodies for the Dura-Ace 10-speed model. To avoid this problem, Shimano changed the spline pattern, making the aluminum spline ridges significantly taller for better support. The downside of this is that those hubs will accept only Shimano Dura-Ace, Ultegra and 105 10-speed cassettes.
|
Generally, Freehub ® bodies are not repaired when they fail, because the labor cost of servicing them is often greater than the cost of buying a brand-new body.
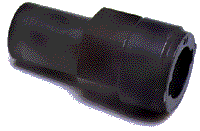
If you really want to take one apart and overhaul it, you'll need a special tool. to unscrew the cup, which is also the cone for the main bearings. The Shimano TL-FH 40 is no longer available, but a Craftsman 1 3/8" drag link socket will work. The procedure is the same as with a conventional freewheel. |
 |
The earliest Shimano Freehubs, however, used a more primitive construction. There was a set of splines to keep the body from rotating on the hub shell, but instead of a hollow bolt to secure the body to the shell, there was a smooth cylindrical projection past the splines, and the corresponding Freehub body was a slip fit over this projection. The axle held the assembly from falling off, but the design was not fully satisfactory. The Freehub body could burnish the projecting sleeve, and loosen.
Replacement bodies are not available for these early hubs, which can sometimes be identified by the narrow barrel, without the characteristic bulge on the right end. (The bulge is to accommodate the threading for the hollow bolt used on newer Shimano Freehubs) See the photos below, kindly provided by David Landsberg.
Some of the older hubs have the bulge anyway -- see the additional photo kindly provided by Laurence Yeandle.

![]()