Traditional Thread-on Freewheels

|

with revisions and additions by John Allen
| Traditional Threaded Freewheel |
Traditional Threaded Hub |
Cassette Freehub ® |
Cassette Cluster |
|---|
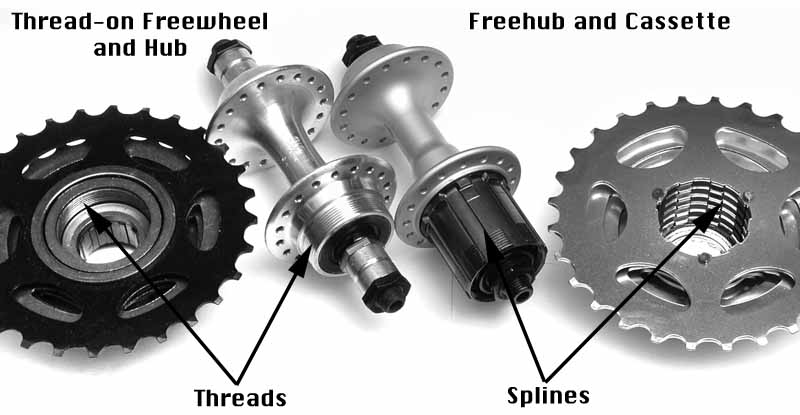
Older multi-speed bicycles have simple rear hubs with a set of threads on the right side of the hub shell. A traditional freewheel cluster has matching threads which screw onto the hub.
This is different from the more modern "Freehub ®" or "cassette hub" design, in which the freewheeling ratchet mechanism is a more-or-less integral part of the hub. See also my article on Cassette Hubs.
A standard freewheel attaches to a hub by screwing on to external threads that are part of the hub. Pedaling tightens the freewheel down on the threads, so no tools are required to install a freewheel.
The outer body of a freewheel can turn freely in one direction relative to the inner body, but not in the other direction. Most freewheels achieve this by means of pawls which engage a ratchet. The photo below shows the inner body (the part that threads onto the hub) of a freewheel. The outer body (the part that holds the sprockets) has been removed. The red arrow points to one of the two pawls of this freewheel. Small wire springs, visible in the photo, press the pawls outward.

The photo below shows the outer body from the back (left) side. The ratchet is the circular stepwise arrangement near the center of the photo. When the cyclist coasts, the pawls slip forward (counterclockwise in the rear photo) over the rachet. The freewheel makes a characteristic tick-tick-tick sound as the pawls spring into place behind ratchet teeth. When the cyclist is pedaling, the outer body also turns (counterclockwise in the photo), the pawls engage the ratchet teeth and the freewheel is silent. This particular freewheel has two pawls directly opposite one another and an odd number of ratchet teeth, 15, so only one pawl engages at a time.

The photo also shows bearing balls in a bearing race, embedded in grease to hold them in place during assembly (also a few bearing balls that got away). The bearing balls roll between this bearing race and one on the inner body. In the previous photo, part of the inner body's bearing race is visible as a polished arc (blue arrow). The front (right) side of the freewheel has another bearing assembly, not shown in these photos. The bearings center the outer body on the inner body, and allow the inner and outer body to turn freely relative to each other when the cyclist is coasting.
The standard ISO threading for freewheels is 1.375 x 24 TPI, the same as for standard ISO bottom brackets.
| Type | Inch | Metric |
|---|---|---|
| Italian | 1.378" x 24 tpi | 35 x 1.058 mm |
| ISO | 1.375" x 24 tpi | 34.92 x 1.058 mm |
| British | 1.370" x 24 tpi | 34.80 x 1.058 mm |
| French | 1.366" x 25.4 tpi | 34.7 x 1 mm |
| Metric BMX | 1.181" x 25.4 tpi | 30 x 1 mm |
All recent freewheels and threaded hubs, regardless of where made, use ISO threading. The older British and Italian standards use the same thread pitch but a very slightly different thread diameter, and are generally interchangeable. However, for strong riders and on tandems, it is best not to mix and match -- freewheels sometimes do strip the threads of aluminium hubs. A French freewheel may start to thread onto an ISO/British/Italian hub but will soon bind. An ISO/British/Italian freewheel will skim the top of the threads of a French hub and will slip forward if an attempt is made to use it. Do not force a freewheel -- you will ruin the hub.
A bottom-bracket cup can serve as a thread gauge for a freewheel: Dimensions are usually marked on cups. Hold the threads of the bottom-bracket cup against those of the hub, and look in between, against the light. If the threads engage tightly all the way across, the thread pitch is the same. If they rock across each other, it is different. You may check the thread pitch of a freewheel by threading an ISO left bottom-bracket cup into it (not a right cup, which is left-threaded). The cup will go in easily if the thread pitch is the same -- if the fit gets sticky, you my need a freewheel extractor tool handy so you can unscrew the cup.
![]()
![]()
Freewheels screw onto the hub without any tools, then, as you ride the bike, your pedaling effort tightens them down.
A freewheel that has been ridden for a long time, especially by a strong rider with low gears, may be quite difficult to remove because the threads are so tight.
Freewheel bodies have a larger diameter than the spoking flange of many hubs. Warning: loosen a freewheel before cutting the spokes to replace the rim, otherwise you may not be able to loosen the freewheel or to replace the spokes on the right side of the wheel. The barrel (between the flanges) of many hubs will break if you respoke only the left side and then try to unscrew the freewheel.
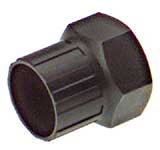
Although you can screw the freewheel on by hand, just by turning the sprockets clockwise, when you want to remove it, the sprockets don't help, because the freewheel's ratchet mechanism lets it spin freely counterclockwise. To remove a freewheel requires a special tool, commonly called a "freewheel puller" or "freewheel extractor", to grab hold of the core of the freewheel.
This tool is a splined unit that may be mounted in a vise or turned with a wrench. The splines engage matching splines in the interior (always rotates with the wheel) part of the freewheel body. Different brands of freewheels have used different spline patterns, but there is a recent tendency to standardize on the Shimano pattern.
Older freewheels had simple notches and matching extractors with two or four "bosses" (prongs.) The shape and spacing of these prongs would vary from one brand to another. It was very common for the prongs to get rounded off or broken, and to ruin the freewheel. Once the notches are damaged, or to remove and discard an old freewheel for which you have no tool, you must disassemble the freewheel and clamp the core into a vise -- left side of the wheel up -- then unscrew the wheel counterclockwise.
When using a boss-type freewheel puller, the tool should be secured against the freewheel by tightening down the axle nut or quick release skewer (with the springs left off). Once the freewheel has broken loose from the hub, remove the axle nut or skewer before unscrewing the freewheel any further -- or else you will break something.
| Some Popular Freewheel Tools | |||
|---|---|---|---|
Park FR-1
 Shimano large-spline current model, 12 splines (Also works for SRAM/Sachs and most HG cassette lock rings.) |
Park FR-2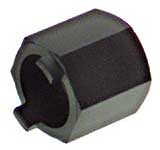 SunTour 2-prong. |
Park FR-3 SunTour 4-prong. |
Park FR-4 Atom/Regina splined. 20 splines. (About the same outside diameter as a nickel.) |
The usual technique for removing a freewheel from its hub is to clamp the freewheel puller into a solidly-mounted vise and unscrew the wheel from the freewheel. If your vise allows this, it works better if you clamp it so that the wheel is in a vertical position. permitting you to twist harder without having your feet slip on the floor. This gives you better purchase to turn the wheel. I used to work in a shop where we had a vise mounted sideways on a door frame for this purpose. My present vise has an extra pivot that permits the jaws to be rotated 360 degrees. Unfortunately, most vises lack this useful feature, so you may have to make do with a horizontal wheel orientation.
An alternate approach which I have found to work quite well for really obstinate freewheels is to use a suitable box wrench to hold the tool, and strike the wrench handle sharply with a big rubber mallet. I use a Park chain whip, because it has a hexagonal hole in the handle that fits Park freewheel pullers perfectly.
Whatever method you use, it is best if the wheel has a tire installed and inflated. This will improve grip and reduce the risk of damaging the rim.
![]()
![]()
Installing a freewheel is quite easy, and requires no tools at all. Basically you just screw the freewheel on as you would screw the cap onto a jar. The final tightening will occur by "foot power" as soon as you ride up your first hill. You can feel the freewheel slip forward. Still, if you are building up a bicycle for someone else, it's a good idea to tighten the sprockets with a chain tool, or to pedal the bicycle in all the threaded sprockets, to avoid creating the impression that something is wrong.
The foot power is very considerable, and that's why it can be so hard to remove a freewheel that has been used for a while, especially on a bike with low gearing. To prevent future difficulty with removal, it is very important to grease the threads before screwing a freewheel onto your hub!
The type of grease used is not all that important, but you must use something. The anti-seize compound that is commonly used for spoke nipples works even better..
Make very sure that the freewheel is going on straight. Freewheel threads are unusually fine for their diameter, and the aluminium threads on the hub are soft, easily damaged if you cross-thread the freewheel. Again, if the freewheel is going on straight but starts to bind, don't force it: you have mismatched threads and will damage the hub.
Freewheels should be oiled from time to time with a medium-weight oil.
This is easy to do, and generally requires no disassembly. Warning, though: unless the freewheel body is clean, the oil will carry grit and grime into the mechanism!
If the body is clean, do this:
Hold the bicycle with the rear wheel off the ground, and leaning to the left at about a 45 degree angle. An assistant may be helpful for this. Turn the pedals around a couple of times to get the wheel spinning fast, then let it coast (helps to be in high gear for this.)
Look inside the smallest sprocket. The sprocket will be stationary, since the wheel is coasting, but you'll see an inner part of the freewheel that is spinning with the wheel. Drip oil onto the crack between the turning part and the stationary part. Gravity and capillary action will help work oil into the freewheel.
Repeat this a few times, until you hear a change in the sound of the clicking pawls (they'll generally get quieter when the oil reaches them.)
This should be done every year or so, or any time that coasting sounds loud.
If the right side of the freewheel body is dirty, remove the wheel, then the freewheel. The back side of the freewheel may be clean. In that case, you may drip oil into the crack on the back side while spinning the inner body.
If neither side is clean, you have three choices:
Phil Wood & Co. used to make a grease injector for freewheels. The freewheel would screw onto this the way it screws onto a wheel. You could pump enough grease into a freewheel to push all the dirt out. However, only very light grease -- or oil -- should be used, because thick grease prevents the pawls from engaging.
Most multi-speed freewheels have replaceable, interchangeable sprockets. It used to be a common bike-shop service to assemble custom freewheels with any desired combination of sprocket sizes. Unfortunately, with the general decline in freewheels, replacement sprockets are no longer as readily available as they once were. They do show up on eBay, and it is also possible to restore an older, worn sprocket with some judicious grinding.
Sprockets of older freewheels had taller teeth than are usual today. When a sprocket and chain wore together, they would form a hook shape at the back side of each sprocket tooth. A new, replacement chain's shorter links would fall into the hollow behind the hook of one tooth, ride up over the next tooth, and jump forward when that tooth came around to the top.
It is possible to extend the life of a hooked sprocket by grinding off the hooks with a Dremel tool or disk sander. The hardened metal surface has already worn off, so the revived sprocket will wear faster than a new one. Newer sprockets must usually simply be replaced, as the teeth are not tall enough to allow of restoration: see our article on sprocket and chain wear.
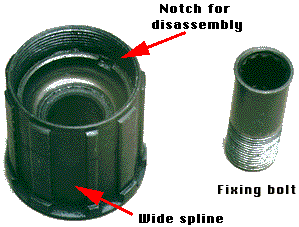
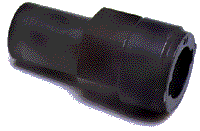
To remove sprockets from a freewheel for replacement or restoration, you normally use two chain whips: one to unscrew the sprocket, the other to prevent the freewheel from rotating backwards. This is easiest with the freewheel installed on the wheel. Or you can use a special freewheel vise in place of the second chain whip. Remove the freewheel from the wheel to use the freewheel vise.
. 
Freewheel vise. The photo is for illustration only. The freewheel vise must be clamped in a bench vise in use and when separating two sprockets of nearly the same size, place the smaller one underneath, for less interference with the chain whip.
Older European freewheels mostly used all threaded sprockets. Usually the two largest would have left threading, and would have to be removed/replaced at the wide end of the freewheel. Because of the low gearing provided by the larger sprockets, they would usually be screwed on very, very tight, and could require a considerable amount of effort to unscrew. The smaller sprockets would screw on from the outside, using normal right threading. If you don't have a chain whip, or if you are trying to remove a particularly stubborn threaded sprocket, you can substitute a short length of chain held in a vise

A length of chain and a bench vise also can clamp a sprocket
In practice, you usually did not have to remove all of the sprockets at the same time, because you needed a sprocket to hold the freewheel in place while you unscrewed the one you wanted to remove. There were special vises that gripped the threads to let you take off the last sprocket, but I never found the need to use one. Another way to remove all of the sprockets is to tighten the two largest ones against each other, loosen the remaining smaller sprocket and then unscrew the largest sprockets from each other. British Cyclo freewheels were different -- all the sprockets screwed on from the left except the smallest -- and quickest wearing -- one! This sprocket was integral with the freewheel body and could not be removed. Mechanics who didn't know this have broken teeth off this sprocket trying to remove it. But that's ancient history and you will probably never see a British Cyclo freewheel!
Newer freewheels use splined sprockets: you need only unscrew one or two outer sprockets, and then the others slip off. Shimano Hyperglide freewheels use all splined sprockets, with a threaded lockring similar to the system used on Hyperglide cassette hubs.
Keep track of the spacers between the sprockets, to maintain correct sprocket spacing when you reassemble the freewheel. When reassembling the sprockets to the freewheel body, grease the threads to prevent corrosion and make removal easier the next time.
Many sprockets are asymmetrical. The high side of the teeth of SunTour sprockets faces to the right. The ramps for chain pickup on newer sprockets also face to the right. If installed backwards, these sprockets will shift very poorly. Some older sprockets are symmetrical, so you can extend their life by turning them over.
![]()
![]()
With older freewheels, there were commonly 2 or 3 different thread sizes on the same freewheel, so sprockets made for one position wouldn't necessarily fit on another position. Threaded sprockets also had built-in spacers, so they could only be installed in one direction.
In the mid-1970s, SunTour and later, Shimano took the freewheel business away from the long-established European manufacturers, such as Atom, Campagnolo, Cyclo, Everest, Maillard, Regina, TDC... by virtue of greatly superior design and workmanship, even though the metallurgy of the Japanese products was not as good:
 |
 |
|---|---|
| French freewheel with weak notches | SunTour freewheel with stronger notches. |
![]()
![]()
The first multiple-speed freewheels had 3 sprockets, using the traditional 1/8" chain.
In the 1950s, narrower 3/32" sprockets and chains were introduced, permitting the move to 4-sprocket freewheels within the then-standard 114 mm (4 1/2") frame spacing
Standard spaced 6-speeds required increasing the frame spacing to 126 mm, aggravating the problems introduced with the move to 5-speed, but still providing satisfactory service in most cases.
As it turned out, the increased length of un-supported axle sticking out from the right side of the hub was just too long for traditional 10 mm threaded axles. 8-speed freewheels were sold for several years, but a very large percentage of the riders who bought them wound up having problems with axle breakage/bendage. As a result, 8-speed freewheels eventually pretty much disappeared from the market.
This also coincided with the increasing popularity of the cassette Freehub ® which didn't have the problem of axle protrusion. As the number of sprockets has continued to increase to 9 and beyond, thread-on freewheels have become obsolete for high-end applications. 9- or 10-speed freewheels have never been produced, as all modern derailer bikes of decent quality use the much superior cassette Freehub system.
![]()
![]()
[ Most of this section can be blamed on John Allen :-) ]
Do you need to replace an older, threaded rear hub to update to a modern, index-shifting drivetrain?
Not unless you insist on having more rear sprockets than you probably need. It's nice spec hype to advertise 9, 10, 11 speeds at the rear, but you can get a wide range and narrow steps with 6 or 7 sprockets and compact double (see example) or triple chainwheels.
Modern 5-and 6-speed freewheels have a 5.5 mm sprocket spacing that works with Shimano 5-and 6-speed indexed shifters. 7-speed freewheels -- and old SunTour Ultra freewheels -- have a 5 mm sprocket-to-sprocket spacing that works with Shimano 7- or 8-speed click shifters and rear derailers -- see table of sprocket spacings. (You may need to adjust the cable routing slightly with an 8-speed shifter). An index shifter's extra clicks will be blocked by the limit stop on the derailer. 8-speed chain works with all of these freewheels, and it is more durable than the narrower chains used for 9 or more speeds.
7-speed freewheels with 13-15-17-19-21-24-28 teeth are available from Shimano, SunRace and IRD. This is a nice, even progression, or you may choose another. Modern freewheels have the same easy-shifting features as cassettes.
Unless you are willing to put up with friction shifting, you need to install new shifters. Indexing handlebar-end shifters, top-mount shifters or downtube shift levers let you know how to shift by feel. Brake-lever shifters return to the same position after every shift, so they don't tell you what gear you are using. They also tend to be expensive. Brazed-on bosses for downtube shifters on some older frames will not fit today's index shift levers or cable stops, so you will need to use a clamp-on adapter.
A 5-speed freewheel or Suntour Ultra-6 will work with the 120 mm rear dropout spacing that was usual in the 1970s. A 7-speed freewheel needs at least 126 mm spacing, but only steel frames are likely to have narrower spacing, and they can usually be cold set to spread the dropouts. You also may need to redish the rear wheel-- see article on frame spacing. To convert to a cassette, you would have to replace the rear wheel.
To be sure, freewheel choices are somewhat limited, unless you have been hoarding old sprockets. Back in the days of 4-, 5-, even 6-speed freewheels, it used to be common to customize the ratios. When there were so few sprocket positions on a freewheel, it was more important to provide the specific sizes to match a given rider's style and riding conditions.
As sprockets proliferated through 7-, 8-, 9- and now 10, 11, 12-speed cassettes, this became less of an issue. As a result, custom gearing is now much less common than formerly. Still, with a ttriple crankset, you can have narrow steps and a wide range with 6 or 7 sprockets at the rear.
On the other hand -- many older cyclists assume that it is harder to customize cassette-type clusters than it was with the old thread-on freewheels. In fact, the opposite is the case! Cassettes are much easier to customize, because all of the sprockets use the same spline pattern, so any of the sprockets (except the smallest one) can be used at any position on the Freehub body. With thread-on freewheels, the body is "stepped" and sprockets for different positions attach with different spline or thread patterns. Back in the day, better bike shops would have a big "sprocket board" with dozens of hooks to stock all of the various permutations of tooth count and attachment size needed to create custom freewheels. Generally each different manufacturer would require a different sprocket board, because each manufacturer would have its own proprietary design.
Note: Except in urgent cases:
working on freewheel bodies is generally not worth the trouble. The freewheel gets the least wear of any bearing on a bicycle, since it is in relative motion only when it is not carrying a load.
Still, you may need to service a freewheel. Some freewheels have one more internal shim than needed, making them rock noticeably as you ride. Some SunTour Pro Compe and Perfect freewheels tend to unscrew the outer bearing cone. Fortunately, only the bearing balls will fall out: the axle and dropout will retain the other parts. It is usually possible to screw the bearing cone back in (counterclockwise) and ride home as long as you don't coast, and then rebuild the freewheel.
See our page on rebuilding freewheels if you need to correct these problems, or rebuild a freewheel for any other reason.
 Many Shimano Freehub bodies may be serviced in the same way as conventional freewheels, if you can find an old-style Shimano special tool (TL-FH 40) to unscrew the cup, which is also the cone for the main bearings. Cassette bodies are common and easily replaced, so there is rarely a good reason to rebuild one. Cassette bodies of other brands require other tools, or may not be rebuildable.
![]()
