Home-Built Tandem Bicycles

|

 |
 |
 |
 |
|---|---|---|---|
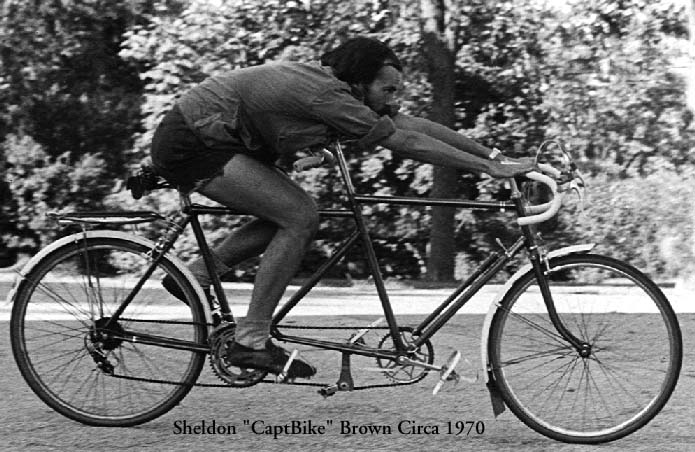
| The second tandem I built, in the late '60's. I couldn't always find a stoker. |
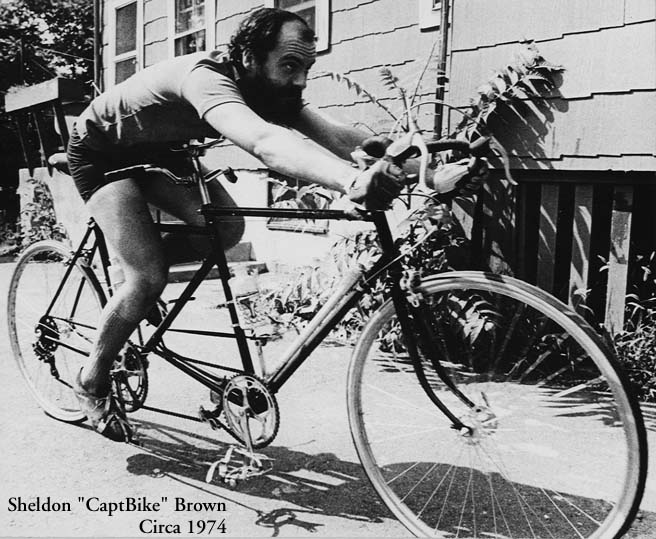
Another of my home-brew tandems. I courted my wife on this one. |
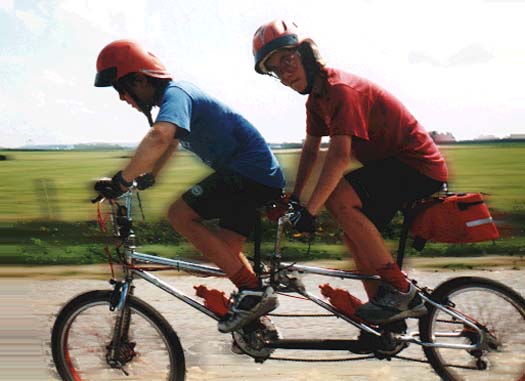
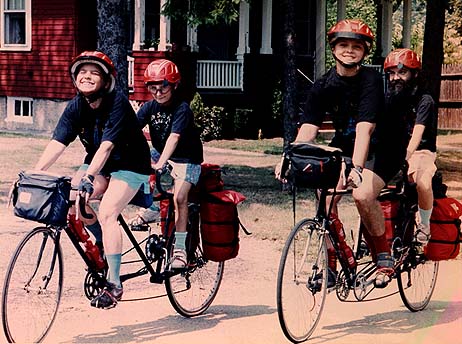
I built this tandem by brazing two BMX frames together. | Our Cape Cod hostel trip. The head transplants were not permanent. |
If you are ready to make the commitment to a good quality tandem, and have the resources to do so, go for it, you won't regret it.
But is that the only way to go? Not for everybody. If you are, perhaps not sure how well you would like tandemming, or are on a tight budget...and are handy with tools, a cheap tandem or a home-built tandem is better than no tandem at all.
I have built perhaps a dozen of these over the years, starting when I was in high school, back in 1960 or thereabouts.
This article describes one way of building a tandem by grafting two solos together. The resulting tandem will not have the ride quality nor the reliability of a multi-thousand-dollar tandem from a tandem specialist builder. It will, however, be superior to many "serious" tandems of the 1970's and earlier.
If you are not already a tinkerer who can fix most anything that can go wrong with a bike, you are not ready to build a tandem. This design is best suited to teams with small stokers, because a large or even medium-sized stoker will likely feel cramped by the short rear top tube. In addition, the single-bicycle parts may not give good service with a heavy team.
Did I scare you off? Ok, then, let's go!
![]()
![]()
In addition to the usual bicycle tools, you will need a hacksaw, a half-round file, Vise-Grip ® type locking pliers, some string, a ruler and patience. It will help a lot if you have a solid workbench with a vise securely attached to it. You will need to do some sort of paint job afterward, if only to prevent rust.
I have generally used Raleigh-built 3-speed frames. These are reasonably plentiful in my part of the country, they are quite solid, and their geometry works well.
Perhaps a better choice now would be mid-range mountain bike frames, preferably with chrome-moly (4130) tubing.
It would be particularly desirable if the front frame was set up for an oversized fork/headset.
When these conditions are fulfilled, the rear head tube can mate with the front seat tube for a solid, easily secured connection.
I prepared the frames and cleaned up the areas for brazing by filing and sanding the paint down to bare metal. The head tube of the rear frame fits around the seat tube of the front frame (I cut off the front half of the head tube). A Vise-Grip will hold this joint in place during brazing.
Bend the front chain stays in and up, file them so that they are a good fit against the lower part of the rear down tube. Take the time to file the surface of the drop outs and bend the stays so that the drop outs make a really good, close contact with the down tube, this is the most critical part of the assembly/alignment process. Both dropouts should be pressing lightly against the down tube when the front joint is Vise-Gripped together, then you can check the alignment by string and eyeball.
Once the frames are roughly fitted to one another (but before the are brazed) it is a good idea to install a pair of wheels and check how high the bottom brackets will be from the road surface. Ideally, they should both be in the range of 11 -11 1/2 inches (280-290 mm) If either bottom bracket is much lower than that, you are likely to strike a pedal on the road now and then, which can be quite dangerous. If the front bottom bracket is much higher than that, it can make starting and stopping difficult. If the rear bottom bracket is high, handling will suffer a bit, but you can live with it.
![]()
![]()
The old string trick is also worth doing. Tie one end of a piece of string to one rear drop out, pull the string along the bike and around the head tube and back to the opposite drop out. Make sure that the string is running along the corresponding surface of each drop out for symmetry. Then, use a ruler to measure how close the string is to each side of each seat tube. If the frame is properly aligned, the distances will be the same on each side.
With the first two tandems I built, I didn't do the brazing myself, as I hadn't learned how. Instead, I just brought the clamped-together, pre-aligned frames into a welding shop that does brazing. You can probably get it done for a few bucks, if you aren't fussy about how pretty it is.
A CrMo mountain bike fork with bosses for cantilever brakes can be had pretty cheaply these days. Check with your local bicycle shop, they often wind up with surplus forks of quite good quality when upgrading mountain bikes to use suspension forks.
If you want to use 630 or 622 mm wheels, you will need unusually strong ones. Most tandems with these sizes use 40 or 48 spokes per wheel, and even so they will be unreliable unless very carefully built.
I would also highly recommend that you install high-performance brake shoes, such as Mathausers, and good quality cables and housing. See my articles on cantilever brakes and cable setup for details.
![]()
![]()
There are many permutations of drive trains possible for tandem use. Ideally, you should buy a tandem-specific crossover drive crank set, but this is not the only possibility.
The main problem with crossover drive for a homebuilder on a tight budget is pedal threading. Bicycle pedals are threaded with normal right threads on the right side, but the left side has left (reverse) threads. Cranks for solo bicycles have right threads on the crank with the chainwheel, left threads on the plain crank.
A crossover drive crankset should have a plain crank with right threads, and two cranks with chainwheels and left threads. The forth crank is the one used for the primary chain, and is the same as on a solo.
It is possible to use conventional cranks in a crossover setup, but you will need 3 right pedals and one left. The three pedals that are threaded the wrong way must be tightened very securely into their cranks, preferably with a thread adhesive, such as Loctite ®.
With some pedals it is possible to interchange the axles, so that the pedal which is shaped for the left foot can have the right-threaded axle, and vice versa. This is not generally possible with clipless pedals.
Crossover drive can be set up in two different ways:
Front drive has much to recommend it, particularly on a home-built. It puts less torsional stress on the crossover bottom bracket. A front-drive setup will usually provide better front shifting, and you never have to worry about cross-chaining, since the chain run is so long that all gears may be used without concern for the chain angle.
Front drive is a bit heavier, due to the extra length of chain required, and you also need to take care that the stoker crank does not strike the chain.
John Allen has an illustrated article about tandem drivetrains which goes into somewhat more detail on this topic.
![]()
![]()
You can use any size for the synch chainwheels, as long as they match, but it is a good idea to make them fairly large. The larger the chainwheels are, the less stress there is on the chain and on the frame. Since home-built tandems don't usually have as rigid frames as store-bought ones, the extra tug of a synch chain pulled by a small chainwheel can cause excessive flex under load. I would recommend chainwheels in the range of 40 teeth or larger.
The other usual approach is to use some sort of adjustable pulley on the un-tensioned part of the chain. Most of my home-builts use old rear derailers for this purpose. The derailer may be mounted to any convenient part of the frame, and the high-gear limit screw may be used to fine tune the alignment so that it lines up with the synch chainwheels.
Another trick that sometimes works is to install a "ghost chainring". This would be a chainring somewhat larger than the synch chainwheels stuck somewhere in the middle of the synch chain, with its top and bottom teeth engaging the synch chain. As the upper part of the synch chain moves forward, the lower part moves backward, so the ghost chainring revolves while holding its position, even though it is not attached to any part of the frame. It is quite an eye-catching effect.
If you use a kidback for the rear bottom bracket, as in the photo , the kidback itself permits the necessary adjustment. Then again, you may just luck out, as I did on the "kid-kid tandem" I built for my kids. I found that if I used odd-sized chainweels, the tension was OK with no tensioner at all. (Changing from even-sized to odd-size synch chainwheels is the same as adding or removing 1/2" to the distance between bottom brackets.)
Another possibility is to make an adjustable stem. I made one out of a discarded frame. I cut the seat cluster away from the donor frame, cutting the seat tube just below the seat lug, completely removing the seat stays, but leaving a few inches of the top tube attached to the lug. The lug was mounted upside down to the extended seatpost of the front frame, with its stub of top tube pointing backwards. A conventional handlebar stem slips neatly into the remnant of top tube, and is secured in the normal manner by the wedge bolt. Just to be on the safe side, I also added an external clamp to the open end of the former top tube.
![]()
![]()
![]()
![]()
![]()
Last Updated: by Harriet Fell