Cables

|

revised by John "Fatigue's Foe" Allen
This article covers general questions about bicycle cables -- different types, how they work, how they stop working, why bicycles use them. In connection with this article, also see
Any vehicle needs a way to pass control from the operator to the machinery. Hydraulic service brakes have been usual for decades on motor vehicles. Electronic control of the motor and transmission also is common, though many motor vehicles have a cable to operate the throttle. Cable-operated parking brakes are usual though, to be completely independent of the hydraulic system.
Why might it make sense to stick with cables on a bicycle?
High-end road bikes and mountain bikes often forego cables, but they are the norm on everyday bicycles. Hydraulic brake actuation is an expensive option that can somewhat improve brake performance. Electronic shifting also is expensive. Its main advantage is to improve convenience of shifting. Both pose the increased risk of misadjustment or breakdown that can't be corrected during a ride.
Cables used on bicycles are in two parts. The inner wire is made of strands of steel twisted together. The outer housing is also made of flexible steel, usually wound in a helix. The inner wire runs down the middle of the housing. Both parts are equally important: neither can work without the other.
Isaac Newton said "For every action, there is an equal and opposite reaction." In the case of bicycle cables, this means that there cannot be a pull on an inner cable without an equal push on the housing. The housing gives the pull of the cable something to pull against.
This type of cable is called a Bowden cable, after its presumed inventor. A Bowden cable can apply force in two opposite directions at the same time, and is flexible -- especially important when controls are on the handlebar .That's how the cable can transfer force from the brake lever to one arm of a sidepull brake, and the housing, to the other arm. Looking at the brake, you will see that the cable pulls, and the housing pushes -- equal and opposite.
Or, think of a tug-of-war: The two teams are pulling on opposite ends of the rope, like the brake lever and the brake. The ground underneath is placed in compression, like the cable housing.
To save weight, many bicycles substitute the bicycle frame for some sections of the housing. This is done by attaching "cable stops" to the frame or fork. A cable stop has a socket to receive an end of a cable housing, and a small hole or slot through which the inner cable can pass, but the housing can't. The "push" of the housing is transferred to the frame, so the inner wire can run bare until it gets to another cable stop facing the other way, where the "push" from the frame is transferred back to another length of housing.
This "bare cable" routing can be done anywhere that the cable runs in a straight line and doesn't have to bend. Housing must be used from the handlebars to the frame, to accommodate the turning of the handlebars as the bicycle is steered. Housing must also be used where a cable moves the two arms of a brake in opposite directions. Sometimes, the inner wire is stationary and only the housing moves -- see this example. Lengths of housing are also commonly used when the direction of pull of the cable must be changed.
Bare cable may pass over a pulley to change its direction. Most shift levers use a pulley sector to store the cable that they take up and release.
![]()
![]()
The inner wire of a bicycle cable is actually a sheaf of very thin wires, twisted together the same way as a rope.
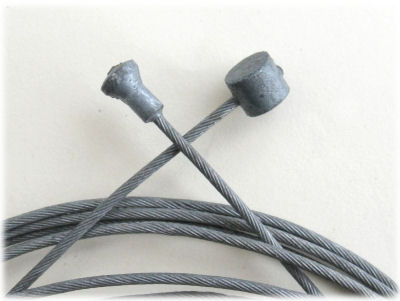
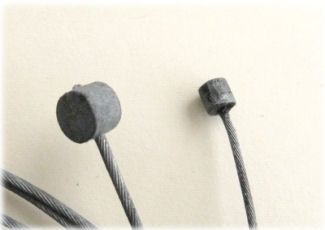
The inner wire has a fitting at one end to attach it to the brake or shift lever. The other end of the cable is usually clamped into place by an anchor bolt, and so there is no fitting on that end. Brake cable inner wire has one of the two fittings shown in the photo below -- cylindrical end, for flat-bar levers, mushroom end for drop-bar levers. Sometimes an inner wire is sold double-ended, with both kinds of fittings, as in the photo below. This inner wire must be cut before it can be used. Because a bicycle's front brake cable is short, it is often is possible to get two usable inner wires from a single double-ended one.
Most shifter cables have a small cylindrical end with the axis parallel to the wire, as shown in the photo below.
Some older shifters take a cable whose cylindrical end comes out of the side of the cylinder, as in the photo below. It shows a partially disassembled Huret shift lever.
The inner wire of brake cable is thicker than that of shifter cable, because it must resist higher tension.
![]()
![]()
Traditional cable housing is a tightly-wrapped helix of steel wire, sort of like a small-diameter Slinky. It has no particular strength in tension (pulling) but it cannot be compressed because the coils of wire are tight against one another.
Through the 1970's, the inner wire ran right through the steel helical housing, usually using grease for lubrication. Modern housing, however, has a plastic liner which surrounds the inner cable. This considerably reduces the friction. Some high-end cable systems, such as the Gore-Tex "Ride-On" cables, extend this liner even along the areas where there is no housing. These systems also have a special friction-reducing coating on the inner wires.
| Parts of traditional cable | |||
|---|---|---|---|
 |
|||
| plastic outer covering | helical housing | plastic liner | inner cable |
With helical housing, indexed shifting and handlebar-mounted shift levers resulted in imprecise shifting. The effective length of the housing changes as it is flexed .The turns of the helix spread apart on the outside of the curve.
"Compressionless" is a marketing expression. Actually, index-compatible cable housing is extensionless: Helical cable housing also is compressionless.
Slight extension of the housing is not a problem with brakes. Sometimes the rear brake may drag slightly when the handlebars are turned all the way to one side, but you can't turn the bars that far when the bike is actually in motion. The small variation in housing length was too much for reliable indexed shifting, however, so Shimano introduced "S.I.S." housing, now widely copied by other manufacturers. This type of housing does not have a single helical-wound wire, but instead, it has a bundle of wires running pretty much straight along parallel to the housing. They are held in place by being sandwiched between the plastic housing liner and the plastic outer covering.
| Parts of index-compatible cable | |||
|---|---|---|---|
 |
|||
| plastic outer covering | longitudinal wires | plastic liner | inner cable |
Index-compatible housing doesn't change length significantly as its curvature changes, and so the shifter is able to communicate the correct setting to the derailer, even as the handlebars are turned, and the loops of cable housing bounce up and down due to bumps.
Warning: Since index-compatible housing relies on plastic to hold it together, it is not as strong as conventional helical housing, and should never be used for brakes! The loads applied to brake cables can easily cause index-compatible housing to rupture and burst, causing a complete and sudden loss of brake function.
Extra care must be used in routing index-compatible housing because it is also less flexible than conventional housing.
(You may be able to get away with helical housing with indexed shifters where there is little or no change in cable curvature. I use helical housing for the handlebar-end shifters on my Bike Friday folding bicycle. The cable's greater flexibility makes the bicycle easier to disassemble and pack for travel. My Bike Friday has an 8-sprocket cassette. A cassette with more sprockets would be more finicky, because the sprockets are closer together.
 The German company Nokon manufactures cables with housings consisting of small, rigid, interlocking aluminum segments, with a low-friction plastic liner. When installed, the cable in its housing looks somewhat like a string of beads. This system is index-compatible but allows much more flex than ordinary index-compatible housing, and also can be used for brakes. The interlocking ends of the segments keep flex below the limit where the inner wire would be damaged. Nokon cables are very expensive but worth the price in demanding applications, especially where the cable must be flexed sharply. One important application is where a cable must pass the hinge of a folding bicycle. "String of beads" cable housing is also made by Jagwire and perhaps other suppliers.
![]()
![]()
Cables can slip if not securely anchored. Housing can get bent; cables and housings can rust and seize up. These problems are obvious and call for replacement.
If helical housing catches on something and takes on a permanent bend, it extends. Bending it back straight does not necessarily restore it to its original length. Turns of the helix may remain separated, resulting in spongy braking or imprecise shifting. Index-compatible housing is easier to damage, because it is less flexible, but does not cause spongy shifting if it is bent.
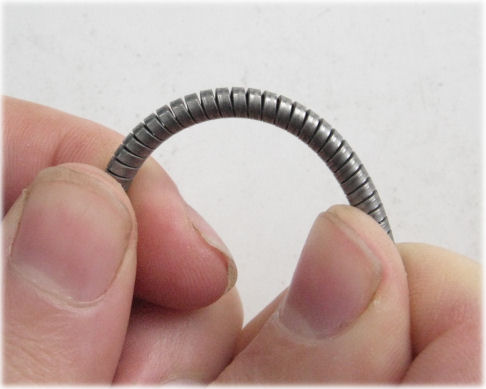
Cables generally don't wear, but they can fatigue and fail when bent back and forth repeatedly, the same way it is possible to break a paperclip. Cables usually break at the lever or where they pass over a pulley. Usually there is no symptom until the cable fails: prevention is by replacing cables on a schedule, or at least checking them frequently. Carry spare cables!
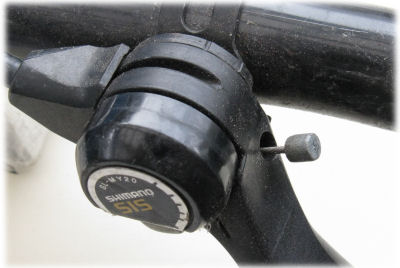
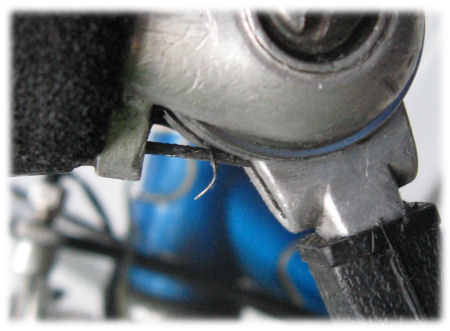
A pulley large enough to avoid fatiguing bicycle cable would be at least a couple of inches across -- impractical for shift levers. A handlebar-end shifter, as shown in the photo below, may give a warning: frayed cable strands may prick fingers, or impair shifting as they push against the housing end stop.
A cable which has begun to fray due to repeated bending
Indicator chains of Sturmey-Archer and Sachs internal-gear hubs have solved the cable fatigue problem for more than a century -- and so, instead, Sturmey-Archer cables fail where they pass over the pulley sector in the shifter.
A compact, lightweight pullchain isn't strong enough to resist the cable pull of a brake, and so a pivot at the lever end is needed instead. The cable-end socket inside a drop-bar brake lever is free to rotate, and so the cable can align itself with the direction of its pull. Flat-bar levers generally rely on the cylindrical cable fitting to make this adjustment. Lubrication of the pivot is important.
Many brakes and derailers attach the cable with an anchor bolt that does not allow the cable to align itself. This problem is generally worst with front derailers. Bending also occurs where a transverse cable passes over the yoke of a cantilever or centerpull brake.
A shift-cable failure usually doesn't lead to a crash, but a brake-cable failure very easily can. This is one reason that every bicycle other than a track-racing bicycle needs two independent braking systems. (The drivetrain of a fixed-gear bicycle does count as one, if the cyclist is skillful in using it for braking.)
(David Gordon Wilson has written an article covering the issue of cable fatigue.)
Prevent cable failure when you can, but be ready when it occurs. In order of importance:
![]()