Bicycle Rim Brakes
|
Translation of this article:
German |

|

This article describes the different types of rim brakes, covers topics which apply to all types of rim brakes, and points to other articles with additional information.
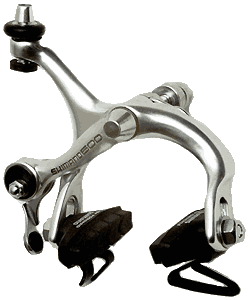
Bicycle brakes fall into two general categories: hub brakes -- or rim brakes, in which the rim does double duty as an unusually large brake disk.
The rim's speed past the brake is nearly the same regardless of wheel size, and so a rim brake works equally well on any size wheel. Because a rim brake operates at nearly the full diameter of the wheel, the clamping force for a given amount of braking is much lighter than for a hub brake. Because this force is lighter, a rim brake stresses the bicycle frame and fork less than a hub brake. Because the rims offer a relatively large heat-dissipating area, rim brakes are relatively safe for speed control on long, downhill runs, on single-rider bicycles.
Rim brakes also have weaknesses. They can overheat the rims on a tandem, causing blowouts. (See the article about tandem brakes). A misaligned brake shoe can destroy a tire or dive under the rim and lock the wheel. Some kinds of rim brakes have pivots above the tire, and work less well if they have to reach down past fat tires. Wet rims reduce brake effectiveness -- drastically with cheap steel rims; moderately with aluminum rims. A rim brake can rub or grab if the rim is damaged. Wear from a rim brake can lead to rim failure. Rim brakes can clog with mud or snow.
All in all, though, rim brakes are simple and practical, and they are preferred for economy, sporty performance and light weight.
Rim brakes fall into some basic categories.
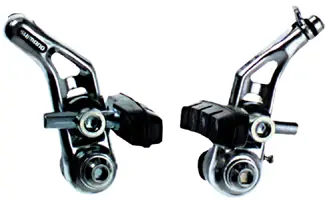 attachment on the same side of the pivot. Each pivot is individually attached to the frame or fork, separately on each side.
 Cantilever brakes, U brakes and Rollercam brakes require special brazed-on fittings on the frame. These fittings are commonly called "studs" or "bosses." A separate article on this site identifies the different types of frame-mounted brakes and points to further information about them.
![]()
![]()
Many brake problems result from excessive friction or poor installation of the cables, not poor setup, or poor quality brakes . See the article on cables for information on cable selection and adjustment of brake cables and brake levers.
For a rim brake to work well, the rim must be clean and of of uniform width, and the wheel must be true. A lumpy or dented rim will make the brake grab. A rim that weaves from side to side will rub on one or both brake shoes and make you go slower whether you want to or not. A rim brake also can drag if misaligned, or if friction in a pivot keeps a brake arm from retracting fully..
| Cross-section of a rim with parallel braking surfaces |
Cross-section of a rim with angled sidewalls |
 |
 |
Most modern rims have parallel braking surfaces. Up through the 1970s, though, most rims had angled sidewalls. Many brakes would not allow the shoes to be adjusted to the needed angle. Also, the sidewalls would act as a wedge, making the rim effectively wider where it ran closer to the hub. A rim brake would grab if there was the slightest unevenness due to a sloppy wheel truing or a curb or pothole impact. A wedge-like rim also could promote brake chatter. Some rims still are made wedge-like. They work fine with hub brakes. Avoid using them with rim brakes.
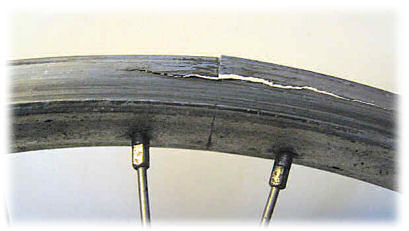
Especially in winter or in off-road riding, grit grinds away at the rim sidewalls, producing a dark-gray powder on aluminum rims that is hard to clean off hands or clothing. If the rim sidewalls are allowed to get too thin, they split. Aluminum rims have this problem bad enough. Rims with carbon-fiber braking surfaces are light, but they wear faster, require special brake shoes and are costly to replace. Many modern rims have a small pit in each sidewall to indicate a safe wear limit. When the pits disappear, a rim should be replaced.
A rim that split due to brake wear
![]()
![]()
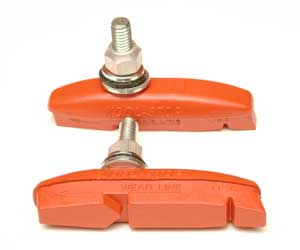
A common type of brake-shoe assembly has a brake block (the rubber part that contacts the rim) separable from the shoe (the metal cradle for the brake block).
Older brake shoes of this type were open at one end, making it easy to slide in a replacement brake block. If the brake shoe was installed backward, the brake block could slide out in use. Modern brake shoes are idiot-proofed -- closed at both ends.
It is still often possible to pry out the brake block with a small flat-blade screwdriver, or you may have to bend down the tab at one end of the brake shoe and slide the brake block out. Bend the tab back up after installing a replacement brake block. A vise is helpful to hold the brake shoe while working with the screwdriver, and to press a brake block in or out.
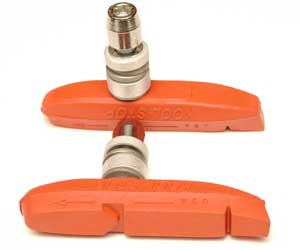
Better modern brake shoes, like those shown below, have a metal plate molded into the rubber.
Smooth Stud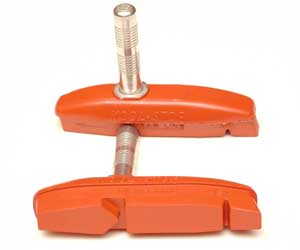 |
Threaded Stud
|
Threaded Stud
|
|---|
It is common for brake shoes, like the ones shown, to be longer to one side of the stud. These brake shoes are relatively thin, allowing them to fit into the tight space between the rim and fork blade despite their greater length.
Braking force tends to rotate the brake shoes slightly in use, so the rear presses harder than the front. To equalize pressure all along the brake shoe, the longer end should face the rear of the bicycle. The result is more uniform wear and reduced tendency toward brake squeal.
The photo above shows brake shoes which attach to the brake arms in three different ways.
Smooth-stud brake shoes are most often used on traditional cantilever and centerpull brakes. With modern brakes, they permit all needed types of adjustment. Older brakes such as the classic Mafacs didn't have any provision for yaw angle (toe-in) adjustment, but most cantilevers made since the 1970s have provided full adjustability.
Threaded-stud brake shoes with plain washers have limited adjustability. For this reason, they are not preferred.
Threaded-stud brake shoes with spherical (domed) washers do allow for all angle adjustments. There are two convex washers, which go inside and outside the arm, and two matching concave washers that mate with the convex ones.
Usually, the concave washers are two different thicknesses, so you can select two different extensions depending on whether you put the thick or thin concave washer on the inside.
This is the most critical adjustment. The shoe should contact the rim fully, but not overlap it. If the shoe is set too high, it will rub on the tire, destroying it very quickly. If the shoe is set too low, it can "dive" under the rim and get caught in the spokes, causing dangerous wheel lockup.
Most rim brakes have a slot in each brake arm. Height is adjusted by sliding the brake shoe post or eyebolt up or down the slot. Different brakes have different ranges of adjustment. Sometimes, getting the height correct may require replacing a brake.
On mountain bikes with narrow rims and big bulgy tires, it may be quite difficult to get a good height adjustment with a cantilever brake, which has frame or fork-mounted pivots below the rim. The shoe may clear the tire when the brake is engaged, but it may rub on the sidewall of the tire in its rest position.
With these cantilever brakes, as the brake shoe material wears down, the shoe hits lower and lower on the rim, increasing the risk of "diving" into the spokes. With other rim brakes, the shoe migrates up toward the tire. Periodic checking is in order.
When you readjust the roll angle, you may also have to readjust the height.
The traditional way to adjust yaw angle was to bend the brake arms. This can lead to failure of aluminum brake arms -- see comments by Jobst Brandt. Use brake shoes with spherical washers, or replace a smooth-stud brake that does not allow yaw-angle adjustment.
The small cantilever angle of newer, narrow-profile cantilever brakes causes the anchor arm to be nearly vertical, especially on mountain bikes that have wide-set pivot bosses and narrow rims. Traditional good practice had been to slide the brake shoe holders all the way into the eyebolts, so that the back of the shoe butts up against the cantilever arm, reducing the likelihood of slippage and brake squeal. .
With the newer low-profile cantilevers, the shoe needs to be extended inward from the arm, increasing the effective cantilever angle. The unsupported length of shaft connecting the brake shoe to the arm may cause an increased tendency to squeal, but that is one of the inherent trade-offs of low-profile brakes. Increasing the extension by only a few millimeters can often dramatically improve the performance of these brakes.
With other types of rim brakes, it is usually best to keep the shoes as close to the arms as they will go, for the sake of rigidity.
Sometimes it is difficult to get all 5 adjustments set at once, and to get the brake shoe tight enough without twisting it out of position. It helps if you remove the nut and lubricate the threads, being careful not to get any lubricant on the rim or the brake shoe.
Probably the best way to adjust the shoes is to use the Shimano technique:
![]()
![]()
A chattering sound while braking may result from sticky brake-shoe deposits on the rim, or from a loose or flimsy brake. Chattering is common with cheap brakes that have thin, stamped-steel brake arms, and may require replacement of the brake. A rim with angled sidewalls promotes chattering, as the flexibility of the brake assembly allows it to ride upward toward wider part of the rim, closer to the tire -- and grab; then downward toward the hub, and loosen.
You may hear a rattle and feel it through the handlebar when you apply the front brake lightly. The rattle stops when the brake is applied harder. The problem isn't actually in the brake at all: it is a loose headset. When you are not using the brake, your weight pushes the front fork forward. Braking pushes it backward, and if the forces balance, road irregularities rattle it back and forth.
A rattle that occurs when the brake is not applied and goes away when it is applied, indicates that something is loose. -- most likely, a brake pivot, or the bolt that attaches a caliper brake to the frame. Find the problem and fix it! A loose front brake can jam in the spokes, tethered by its cable, and is very dangerous. A loose brake shoe can tilt and wear through the tire, or jam the wheel.
If you bear down with your belly on the saddle and try to roll the bicycle backwards and forwards while holding a brake lever, some of the rattles described in the previous section become clunks. A clunk indicates that something is loose. Fix it!
A clunk that occurs once per wheel revolution while braking indicates that the rim has an irregular braking surface. See the longer discussion of this topic in Sheldon's article on creaks and clunks.
Some brake shoes intended for off-road use are made of unusually hard material. It is normal for these brake shoes to make a light scraping noise in use.
Also, wet sand on rims and brake shoes can make a scraping noise. Your rim is being worn down! Usually, releasing and re-engaging the brake a few times will clean off the sand.
Other than this, a scraping noise when the brake is applied is probably from a worn brake shoe whose metal backing plate contacts the rim. Replace the brake shoe before it wears a groove in the rim sidewall.
A musical tone may appear when you apply the brake. The musical pitch falls as the brake slows you down. Some older (pre-1980) rims had textured sidewalls, and with these rims, this noise is normal, if unwelcome: brakes work better on smooth rims. Most often, though, this noise results from a brake shoe that is contacting a tire. The vibration results from the pattern of the tire fabric. The brake shoe may be misadjusted, or the wheel may be misaligned -- see Sheldon's additional comments.
Some tires have smooth rubber on their sidewalls, and then this problem doesn't make a noise. Also check the brake shoes visually. Fix this problem before a brake shoe eats a hole in the tire!
It's caused by the friction of the brakes against the rim flexing the shoes or brake arms, which then slip back, grab, slip back, grab, etc. at high rate -- like a violin bow on a violin string. All brakes do this, but with luck the pitch (frequency) is too high for human hearing.
Occasional squeaks are annoying, but they are generally not a safety issue. On the other hand, a loud and persistent squeal makes it hard to modulate the brake. It is usually caused by a new brake shoe that has not worn in, or by grease or oil on the rim.
You might think that an oily rim would make the brake slip. Instead, it softens the brake-shoe rubber, which leaves sticky deposits on the rim. The brake shoe catches on these, and squeals.
Here are some things to try if your brakes squeal (and also see Jobst Brandt's advice):
![]()
![]()
If a brake appears off-center, check first that the wheel is installed straight in the frame/fork. If the wheel is crooked, and you maladjust the brake to compensate, you are creating two problems where there was only one before.
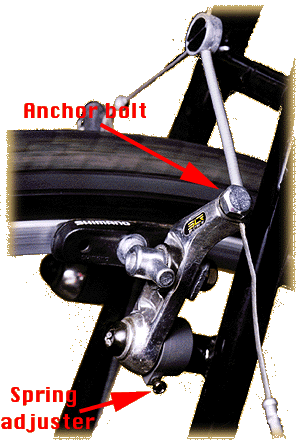
If the brake is, in fact, off-center, it is often the result of too much friction on one of the pivots. Unhook or loosen the cable (the transverse cable, on a cantilever or centerpull brake) and try moving each brake arm individually by hand. They should move smoothly and freely, and always come to rest near the same position. If you suspect friction, unscrew the bolt that holds arm to the boss or pivot, and remove the arm. The surface of the pivot should be smooth, free from rust, and coated with grease. If it is rusty, that is usually a sign that the bicycle was sloppily assembled by the dealer who sold it. Use emery cloth or sandpaper to remove the rust, and wipe off the dust and sand. Coat the boss or pivot with grease, and re-install the brake arm.
On some older and cheaper caliper brakes, including those on many English 3-speed bicycles, the return spring is rigidly attached to the spring block, which fits between the brake arms and the frame or fork. The spring block has a concave surface to mate with the convex surface of the frame or fork. It does not rotate with the brake arms. These brakes can be centered only by bending the spring or repositioning the brake shoes.
Some Dia Compe-style brakes have these adjustable spring blocks on both sides, others have one only on one side, with the other side using the normal spring holes in the boss.
![]()
![]()
Mechanical advantage is a key concept, which you must understand before you will be able to choose and service brakes. Mechanical advantage is commonly referred to as "power", when discussing brakes, and it is common for people to confuse this with quality. A brake may be designed for any amount of mechanical advantage, but there is a fairly narrow range that is usable.
A few models of brake levers have adjustable mechanical advantage. Mechanical advantage may also be adjusted by changing the brake shoe extension or the length of the transverse cable if a brake uses one, or by replacing the brake, the lever or both. Pulley devices such as the Travel Agent also are available to adjust mechanical advantage.
People with brake problems often think that they need more "power," when they actually need less! In particular, when modern low-profile cantilever brakes are used with drop-bar type brake levers, the combination produces excessive mechanical advantage. This problem also arises when using direct-pull cantilevers (such as Shimano's "V-Brakes") with levers made for other brakes.
If your brakes too little mechanical advantage, when you squeeze your brake levers, you may feel a nice firm response. In fact, if you just squeeze the brakes of a bike that is not moving, your first impression may be that the brakes are in great shape, because they feel so solid and firm...the problem is, that they don't stop the bike, unless you squeeze very hard on the levers! A brake system with too little mechanical advantage will push the shoes against the rim quickly, but won't push them hard enough.
In some cases, what appears to be inadequate mechanical advantage turns out to be that the brake shoes are not "grippy" enough; they may be dirty, or dried out, or of low quality. Better-quality shoes can make a real difference. I particularly recommend Kool-Stop Salmon brake shoes, which have good grip and wear slowly.
Ideally, it should start out low, so that the brake shoes can be set for generous rim clearance. The low initial mechanical advantage will allow the shoes to move in toward the rim fast, in response to a small amount of hand-lever movement.
As the shoes get close to the rim, the mechanical advantage should increase, so that a small amount of hand force will result in a strong force pressing the shoes against the rim.
Some high-end brake levers, most notably the upper-end Shimano models with the "servo-wave" feature, are designed to do exactly this.
Unfortunately, conventional center-pull brakes produce exactly the opposite variation! As the lever is pulled, the yoke angle gets sharper and sharper, while, in the case of low-profile cantilever brakes, the pivot-cable distance decreases. Both of these conditions reduce the mechanical advantage as the brake is applied.
Since the travel increases as the brake shoes wear down, braking performance degrades as the shoes wear, not because the shoes have any less grip, but because the mechanical advantage has decreased.
Preferably, every part of a rim-brake system is rigid except the brake shoes. Their compressibility allows them to conform to the shape of the rim and to take up the motion of the brake levers. If, on the other hand, the brake arms are flimsy and flexy, as on cheap long-reach sidepull caliper brakes, there is no way the brakes can develop enough "power". Most of the motion of the brake levers is wasted in flexing the arms. If the mechanical advantage is high, the brake lever will go to the handlebar before the brake shoes grip the rim very hard. If the mechanical advantage is low, the feel at the levers will be harder, but the brake will never develop enough grip.
See also Jobst Brandt's comments on brakes
![]()
Last Updated: by John Allen