Installing and Adjusting Caliper Brakes

|

Caliper brakes are a type of rim brake. In connection with this article, please read the lead article about rim brakes. It covers, among other things,
Most brake problems result from excessive friction or poor installation of the cables, not poor setup, or poor quality brakes. Also see the article on cables for information on cable selection and adjustment of brake cables and brake levers.
Caliper brakes are self-contained mechanisms, attached to the bicycle's frame by a single bolt for each brake, front or rear. The arms reach downward from above the tire, and need to be long enough to get around the tire.
Brakes with brazed-on fittings attach to the sides of a bicycle's frame/fork, separately on each side. They require special brazed-on (or welded) fittings on the frame. The brake for each wheel consists of two separate arms, each of which is individually attached to the frame or fork. See the article on brakes with brazed-on fittings if that is the kind of brake you need to work on.
![]()
![]()
There are three common sub-types of caliper brakes:
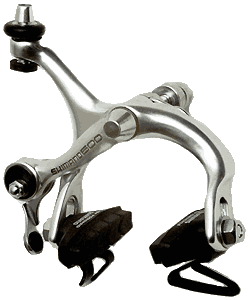
Single-Pivot SidepullsBoth brake arms pivot around the centerbolt that attaches the brake to the frame or fork. The cable housing attaches to one brake arm and the inner wire, to the other. Single-pivot brakes have very little (downward) motion of the brake shoes as they wear, and track a warped rim well, but centering can be an issue, because each brake arm is retracted independently by a spring. |
 |
|---|---|
Dual-Pivot SidepullsThe brake cable housing attaches to one brake arm and the inner wire, to the other. The mechanism is asymmetrical; one brake arm rotates around the centerbolt and the other, around a pivot above the wheel on the side opposite the cable. A cam connects the brake arms so they move by equal and opposite amounts. High mechanical advantage makes this type of brake desirable where reach is long, if the brake also is rigid. A dual-pivot sidepull centers especially well, due to the cam connecting the brake arms. There may even be a centering adjusting screw at the cam. If asked to track a warped rim, the brake rotates around the centerbolt, tending to loosen it. The brake arm on the side with the offset pivot migrates up toward the tire as it wears.
|
 |
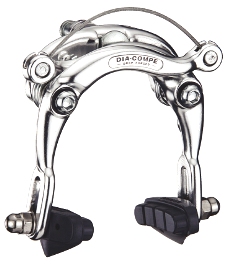
Centerpulls
Each brake arm rotates around a pivot on its side of the wheel, and above the rim. Both brake shoes migrate upward toward the tire as they wear.
Centerpulls were popular in the 1960s and 1970s and are now somewhat popular for bicycles that require a long brake reach. These brakes use a transverse cable and require a frame-or fork-mounted cable hanger, and so are very similar to U brakes. See the article about U brakes for advice on cable installation and adjustment. |
 |
![]()
![]()
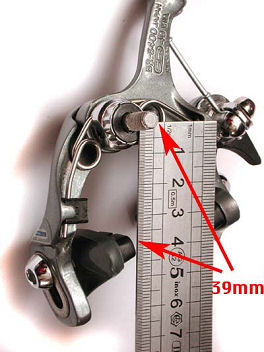
Reach is the effective length of the arms of a caliper brake. This is measured from the centerline of the center bolt diagonally down to the middle of the brake shoe. Reach is commonly expressed as a range (allowing for the fact that the brake shoes are adjustable, typically 10-15 mm).
Reach dimensions can run anywhere from 39-108 mm. There has been a historical trend toward shorter-reach brakes, as newer bicycles, particularly racing-style road bikes, are designed for use with narrow tires and without clearance for fenders.
The reach required for a particular installation depends on the frame construction (how low the brake mounting holes are) and the rim diameter. Generally, shorter-reach brakes work better, due to the reduced potential for flex and the higher mechanical advantage. Long-reach brakes must be of especially stout construction and have long arm extension between the pivot and to the cable attachment to overcome these problems. Cantilever brakes and disk brakes avoid these problems, though they have other problems.
 |
 |
|---|---|
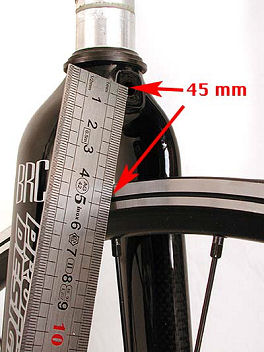
| This caliper has a reach range of 39-49 mm. As shown, with the brake shoe adjusted all the way up, it measures 39 mm from the center of the bolt to the center of the brake pad. | This fork and rim combination call for a brake caliper that can be adjusted to provide a 45 mm reach.
The caliper shown would fit. |
Some people refer to "short-reach" "normal-reach" and "long-reach" calipers, but this is a recipe for confusion, and such terminology should be avoided. As fashion has changed, the 47-57 mm size that used to be "normal" has become "long" and the longer-reach 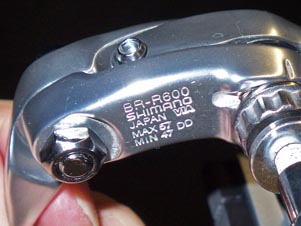 calipers have become nearly extinct, aside from very long BMX calipers.
Currently, "short-reach" calipers usually offer a range of 39-49 mm. This has become the de-facto standard for "road" calipers, and can now be considered "normal", though it is also correct to call it "short."
If you need a brake with longer reach, you can effectively extend the reach by using a drop bolt. Long-reach dual-pivot and centerpull brakes also are made.
Many newer brakes have the reach dimension marked on the back. For instance, the Shimano 600 caliper shown has a 47 - 57 mm reach range.
![]()
![]()
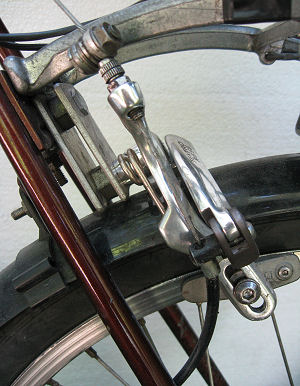
Caliper brakes have a center bolt 6 mm or 1/4" in diameter, which fits through a matching holes in the fork crown or brake bridge of the frame. Traditionally, these bolts have been long enough to protrude all the way through, to be secured by a normal hex nut and associated washers. When a rear brake mounts to a curved surface on the brake bridge, you must use radiused washers (as shown in the photo below) to avoid crushing the brake bridge. If the mounting surface of the front brake is not radiused to fit the fork crown, a washer with a larger radius may be needed to support the brake and avoid unnecessary stress on the brake bolt. The fork crown is strong enough that it will not crush if the nut at the rear is attached using only a flat washer or lockwasher.
Secure mounting of the front brake is very important. A loose front brake will announce itself by rattling, but, unfortunately, some bicycles are already a symphony of rattles, and one more instrument may go unnoticed. If the brake comes off, the brake rotates forward with the wheel, then snags in the spokes. The cable tightens and yanks the handlebar violently to one side. The cyclist is pitched forward and may also suffer abdominal injury from the handlebar.
The front brake bolt or nut should have some kind of anti-rotation treatment, generally a nut with a nylon locking insert or an anti-rotation compound on the brake bolt. You may also use blue threadlock compound.
Most newer good-quality bicycles that use caliper brakes use recessed mounting to save weight and for a more elegant appearance. Calipers intended for recessed mounting have much shorter center bolts, which do not extend all the way through the crown/bridge. Frames/forks designed for recessed mounting have stepped holes...6 mm in front, 8 mm at the back. Instead of a conventional hex nut that takes a 10 mm wrench, a cylindrical nut is used, which is broached for a 5 mm Allen wrench.
 |
|
|---|---|
| Recessed-Mount Rear Caliper Uses 5 mm Allen Wrench |
Traditional Nutted Rear Caliper with 2 radiused washers; uses 10 mm wrench |
Because the trend toward recessed mounting and toward short reach calipers happened simultaneously, most short-reach calipers come set up for recessed mounting. Medium- and long-reach calipers usually come with longer centerbolts for conventional mounting.
 can be safely drilled out. This is more likely to work with a single-pivot or dual-pivot brake, due to the difficulty of routing the cable with a centerpull. Use an 8 mm or USA letter-size O drill bit. A 5/16"drill bit is slightly smaller, and you may have to ream the hole slightly. Radiused washers (as shown on the nutted-style brake in the photo above) must be used if the brake bridge has no flat mounting surfaces. The washer that goes under the nut must be drilled out, and so must the brace of a baggage rack, if it attaches to the brake bolt. Remember to reverse the brake shoes if they are single-ended.
 Front: Here are 3 options:
That's it if you can get two front calipers. Sometimes, you may have to deal with a pair of brakes, with one long and one short bolt. If you used the long one in back, you can use the short one in front two different ways:
You may need to shorten the recessed nut slightly to get it to fit inside your steerer.
[That's Sheldon's suggestion -- I can't figure how this option would secure the brake adequately against the tendency of braking to rotate the shoes forward.-- John Allen]
![]()
![]()
It is most common to install a rear caliper brake behind the seatstays, but a baggage rack may interfere with the brake, or its cable. A brake installation ahead of the seatstays is neater!
Bicycle frames designed for nutted brake bolts don't care which way you install a nutted brake. As already described, a rear brake intended for recessed mounting may be installed ahead of the seatstays after drilling out the back of the brake bridge, the radiused washer, and the rack brace, if any.
To mount a brake ahead of the seatstays on a frame designed for recessed mounting, you may use a front brake made for recessed mounting, or a rear brake made for nut-type mounting.
A centerpull brake mounted this way will have a slightly odd cable pull and will work best on a tall frame.
 On a mixte frame, the rear brake may be installed either above or below the middle set of stays. With a centerpull brake, an open cable may run from a cable stop just behind the head tube to the transverse cable, which passes either side of the seat tube. This installation results in an unusually effective rear brake, because there is little wasted motion in the cable. Another common approach on mixte frames is to use a pulley behind the seat cluster to redirect a cable downward to a centerpull brake at the seatstays. The convoluted cable routing results in much inferior brake performance.
 On a step-through (lady's) frame, mixte frame or monotube frame, a cable may be fed along the uppermost tube(s), then upward to a brake at the seatstays. This is the traditional routing on English three-speeds with lady's frames. It minimizes curves in the cable, and so it minimizes friction.
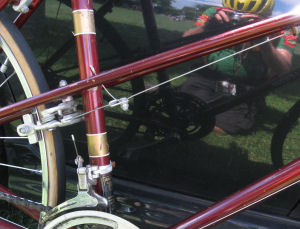
Older sidepull brakes conveniently allow you to switch the positions of the the anchor bolt and adjusting barrel. Many newer brakes have the adjusting barrel threaded directly into the upper brake arm. With these brakes, a bolt-on cable stop can still be installed to replace the anchor bolt at the lower brake arm. As shown, the cable is threaded through the adjusting barrel at the upper brake arm, then secured with a second anchor bolt. This installation is inelegant but it works. Perhaps someday, someone will offer an anchor bolt assembly that threads into the upper brake arm...The installation shown, on a Raleigh Twenty bicycle, also uses a home-made drop bolt.
With a centerpull brake, it is possible to route the cable from underneath by attaching a barrel adjuster to the yoke. The inner wire needs to be secured by an anchor bolt in the seat cluster area. This may conveniently be attached to a seatstay cable stop assembly, replacing a quick-release mechanism.
With a cable routing from underneath, rainwater can slide down the cable into the housing, and accumulate. In winter, it can freeze and disable the brake. For solutions to this problem, see advice in the article about cables.
Routing the cable from underneath to the cable stop at the top of the head tube may be desirable on a front centerpull or cantilever brake on a folding bicycle so that there is enough cable to allow the handlebar and stem to be lifted off and laid alongside the frame. The cable housing is attached to the yoke. In this case, inverted cable attachment to drop-bar brake levers also can be 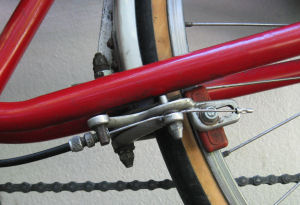 useful (see John Allen's installation on his Raleigh Twenty).
Routng the cable from underneath is also necessary on a Freestyle acrobatic bicycle with a rotor (which allows the front wheel/handlebar assembly to turn around and around without fouling the cable.).
useful (see John Allen's installation on his Raleigh Twenty).
Routng the cable from underneath is also necessary on a Freestyle acrobatic bicycle with a rotor (which allows the front wheel/handlebar assembly to turn around and around without fouling the cable.).
The rear brake is commonly mounted at the chainstays on folding bicycles and recumbents where cable routing to a brake at the seatstays would be inconvenient, or if there are no seatstays. A disadvantage of this location is that the brake is more exposed to dirt.
![]()
![]()
Last Updated: by John Allen