Bicycle Quick-Releases

|


by Sheldon Brown and John Allen
![]()
![]()
Quick-release wheels use a cam mechanism to allow a bicycle's wheels to be removed quickly, and without any tools. Quick releases are also sometimes used for seatposts and stems. Legend has it that in 1927, Tullio Campagnolo was unable to reverse the rear wheel of his bicycle to change gears while racing over the Croce d'Aune pass in the Italian Alps. His frozen fingers were unable to loosen the wingnuts used to hold his wheels in place. This incident supposedly led to his invention of the quick release, first marketed in the early 1930s, though recent research by bicycling historian David Herlihy has revealed that Campagnolo was not on the list of competitors in the legendary race!
A quick-release works by clamping against the outer faces of the bicycle's dropouts, in turn clamping them against the hub's locknuts (or the similar surfaces of some cartridge-bearing hubs).
The skewer is a rod which fits inside a hollow hub axle. The quick-release mechanism consists of the lever/cam/skewer assembly, two small conical springs; and the adjusting nut (acorn nut), as shown in the photo below. The quick-release mechanism sometimes must be removed from the hub, for example when overhauling the hub. The skewer can slide out of the axle after the adjusting nut and one conical spring have been removed. Always reinstall the spring and adjusting nut onto the skewer for storage, so you don't misplace them.

The conical springs press against the ends of the axle and center the skewer over the dropouts. The narrow end of each spring must rest against the end of the axle. As you tighten the skewer, each of these springs compresses so it fits into a recess in the inner face of the cam or adjusting nut. If a spring is facing the wrong way, it will bend out of shape as you adjust and tighten the quick release.

The quick release still works without the springs, but installation of the wheel is more difficult because the skewer must be centered by hand before the axle will slide into the dropouts.
The adjusting nut generally has a friction insert, so the wheel can usually be removed and reinstalled without readjustment -- except if a front fork has a "lawyer lips" secondary retention system. More about those later...
A seatpost or adjustable stem may be secured using quick-release mechanism with a shorter skewer. The example in the photo below is shown disassembled, so you can see the internal mechanism.

![]()
![]()
A traditional, correctly installed quick release is secure against the pull of the chain of a tandem bicycle. Correct installation is essential, though.
Especially with a new combination of wheel and frame, or if there has been damage, make sure everything will fit.
The overlocknut dimension of the hub must match the spacing between the dropouts. The axle must fit into the dropout slots, and must be straight -- spin it to check whether its ends wobble: this is easiest if the quick release has been removed.. The ends of the axle must not protrude past the outside faces of the dropouts, or else the quick release will only tighten against them and leave the wheel loose -- sometimes a problem with thin stamped-steel dropouts on older bicycles. In this case, shorten the axle, or use the wheel on a bicycle with thicker dropouts. The problem can happen with car roof racks too, so always check.
Check that the skewer is straight. It should turn freely inside the hub axle, and the adjusting nut should not wobble as you spin the handle on the other end. Check carefully that the dropouts are correctly aligned so that the hub locknuts engage fully with them. We have an article describing how to check and adjust the dropouts, but also, you may make a quick check using the wheel. With the quick release loosely engaged, there should be no wedge-shaped gap between either hub locknut and the dropout face. If you see a wedge-shaped gap, do not tighten the quick release, or you may bend the skewer, or the axle. The engagement of the quick release should be abrupt followed with force that does not change much as the lever is pressed down: mushy or springy engagement is a sign of poor fit. After tightening, then removing the wheel,"bite marks" from the hub locknuts and quick release should be of even depth all around the dropout face.
The lever must be on the left side of the rear wheel, so the derailer doesn't interfere with it. Thus, the right side is secured by the acorn nut that threads onto the opposite end of the skewer. Usually, the lever for the front wheel also is on the left side, but some Bike Friday travel bicycles fold more easily if the handle is on the right side.
The quick release is a clamping device and does not work like a wingnut. You turn the lever on one side of the wheel against the adjusting nut on the other side only to to prepare for clamping, not to secure the wheel. Using the quick release as a wingnut will not secure the wheel properly.
The photo below shows a hub inserted into the dropouts. Because the quick release is in the open position, there is a gap between the cam body and the dropout. The green arrow points to that gap.


The cam of a quick-release goes "over the top" so the quick release actually loosens very slightly when the lever is pushed all the way down. Vibration then tends to hold the quick release closed, rather than to open it. If the quick release is overtightened to it does not press down all the way, it will loosen.
The tension on the quick-release skewer compresses the hub axle slightly and can put hub bearings out of adjustment. Another article on this site describes how to check for correct adjustment.
To remove a wheel, pull the lever out and away from the wheel and follow through until the lever is fully in the open position. Once the clamping force is released, the lever will easily rotate the rest of the way around to the open position. If a front fork has "lawyer lips," or sometimes just because parts don't fit quite perfectly, you must also unscrew the adjusting nut by a few turns. Then hold the wheel with one hand and lift the bicycle off with the other.
Removal and replacement of a quick-release rear wheel is easy too if you know where to stand and how to hold the bicycle. The video below shows how.
Removing and replacing a rear bicycle wheel from John Allen on Vimeo.
Sometimes it is necessary to replace a quick-release mechanism, or you may wish to replace a conventional skewer with an anti-theft one. Unless you can take the old one with you when buying a new one, you need to know its dimensions. The three important dimensions are diameter, threading and length.
Effective length of a quick-release skewer

![]()
![]()
Starting with the "bike boom" of the early 1970s, multi-speed, derailer-equipped bicycles were increasingly sold to unsophisticated customers. People would use the quick-release like a wingnut, or would close it without clamping it tight, or would overtighten the adjusting nut so the lever would not push down all the way. A vandal also might intentionally loosen a quick release. A skewer can break if it was bent, or if it is overtightened with gorilla force, or defectively manufactured. A bent dropout might not secure the wheel. Disengagement of the front wheel resulted in nasty crashes, and lawsuits, and led to the introduction of secondary retention devices.
Your first line of defense against wheel loss is to install wheels correctly; your second is to check the bicycle before you ride. A secondary retention device is intended to hold the wheel in place in case these measures fail.
Secondary retention devices are of three basic types:
One type, invented by Schwinn engineer Frank Brilando, uses clips attached to the hub axle inboard of the locknuts, and which hook over pegs at the inside of the fork blades. This device is quick to operate, and holds the wheel in place even if the quick-release skewer breaks and falls out. A modified hub and fork are necessary. I've only ever seen this device on Schwinn bicycles. The drawing below is from Brilando's patent.
Here's a rather rusty but still serviceable Schwinn clip found in the wild.

A second type of device uses clips which attach to the dropouts. Brilando invented such a device, shown in the patent drawing below -- before he came up with his better idea. Brilando's dropout clips require special dropouts but work with any hub. The quick release must be loosened to remove the clips. This device acts as a washer, and makes the connection between the hub and fork less secure. Other similar devices rotate around the skewer and clip to the dropout. Those don't hold the wheel if the skewer breaks or falls out, and can easily be removed after unscrewing the quick release's adjusting nut..

Most common, however, are the so-called "lawyer lips" -- raised margins on the fork dropout to retain the quick release's cam body and adjusting nut. More than the other devices, "lawyer lips" complicate wheel removal and replacement, because the quick-release adjusting nut must be unscrewed by several turns to remove the wheel, then screwed back down and adjusted to replace it. "Lawyer lips" do work with any hub, and they avoided payment of royalty fee to Schwinn. Brilando's patent, however, expired in 2006!
There are scuffs on the dropout faces in the photo below: the quick release was loose, and the wheel moved around in the dropouts, despite the "lawyer lips". Also note the uneven depth of the scuff marks. These cheap dropouts, formed by crushing the ends of the fork blades, do not have perfectly flat surfaces.

No secondary retention device secures the wheel as well as the quick release itself. A device which relies on the skewer to hold the wheel offers no protection if the skewer breaks.
![]()
![]()
A quick-release skewer should be of steel. Quick releases with titanium and aluminum skewers are made, to save a few grams of weight. Steel is much stronger, and a steel skewer weighs only a few grams more.
The skewer should be of one piece with the cam body, and their junction should be rounded, to avoid a stress-raising sharp transition.
When you close the skewer, your hand strength is accomplishing two things: It's applying a clamping force to the skewer, and it's overcoming the mechanical friction of the mechanism.
Quick-release mechanisms come in two distinct types: enclosed cam and exposed cam designs.
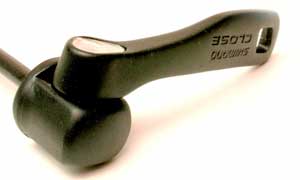
The original type of quick release skewer, invented by Tullio Campagnolo, features a steel cam surrounded by a solid metal body. The body is the part that moves back and forth as you flip the lever, and usually has teeth to press against the left dropout.
The cam is well-shielded against contamination, and can be lubricated by applying a couple of drops of oil every couple of years.
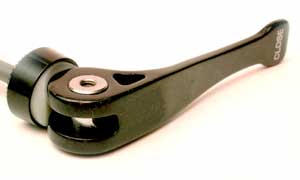
Sometime in the '80s, a variant type of skewer was introduced, one that is less expensive to manufacture, and is sometimes a bit lighter. This type uses a split external cam that straddles the end of the skewer. External-cam skewers use a curved plastic washer between the cam and the toothed metal washer that presses against the dropout.
This type was originally marketed as an "upgrade" because it could be made a little bit lighter.
Despite the marketing hype associated with these "boutique" skewers, they are actually considerably inferior in functionality to the traditional type. They are often seen under rather prestigious names, as was the one photographed here. (I Photoshopped the logo off, so as not to pick on one particular brand.)
The exposed cam cannot be kept as clean and well-lubricated as the shielded one can.
In addition, the exposed cam has a larger diameter, (typically 16 mm vs. 7 mm for an enclosed cam) so the friction is acting on a longer moment arm (the radius of the cam.)
The result is that the exposed-cam type provides very much less clamping force for a given amount of hand force on the lever.
Fortunately, the move toward "boutique" skewers happened after the industry had mostly moved to frames with vertical dropouts and forks with "lawyer lips."
The exposed-cam skewers are generally OK for vertical dropouts in back, and for forks with "lawyer lips", but should not be relied on with horizontal dropouts or plain forks.
Good-quality skewers have acorn nuts with steel serrations that can bite into the face of the dropout, so the wheel won't slip, but most of the "boutique" skewers have soft aluminum parts in this position, presumably to save weight.
The aluminum "teeth" are too soft to get a good grip on the dropout. Since the chain pulls on the right side of the hub, where the acorn nut commonly resides, this type of skewer is almost always unsatisfactory for use with a frame that has horizontal dropouts. In addition, "boutique" skewers generally have (yuck!) aluminum threads, vs. the steel threads of the two-piece acorn nuts. The aluminum threads are much easier to strip.
 |
|
|---|---|
| One-piece aluminum acorn nut. Aluminum threads and teeth. |
Aluminum acorn nut with steel insert. |
As a result of these design flaws, "boutique" skewers should not be used on frames with horizontal dropouts, nor on older forks that don't have "lawyer lips."
There are two problems with the hub in the image below. One is obvious, and is discussed in our article on wheelbuilding. The other problem is the smooth face of the axle end, which does not bite into the dropout. This is less secure than a serrated axle end or locknut.

There have been reports of a particularly nasty failure mode with the exposed-cam type skewer, related to the radiused plastic washer. If the user isn't careful, sometimes this washer can get rotated 90 degrees, so that the cam presses on the flats as shown in the photo below, rather than sitting in the valley of the curved side of the washer. This creates a likelihood that the skewer can rotate if it becomes loose, so that the cam falls into the valley. When this happens, the quick-release becomes so loose that the wheel can fall out, even if a front fork has "lawyer lips".
.
James Annan has created something of a storm in the industry by pointing out a serious safety risk to users of front disc brakes with traditional forks. He has identified a mechanism whereby the forces generated by the disc brake can cause the skewer to loosen up in use!
This failure mode is possible even with the better skewer designs, but it's more likely with the external-cam type.
![]()
![]()
Last Updated: by John Allen