Forkend Alignment

|

Revised by John "Cheap but Hey it Works" Allen
![]()
Forkends need to be at the correct spacing, and parallel to one another, to hold a hub axle securely and avoid damage to the hub.
Another article on this site describes spreading the rear end of a frame to accept a wider hub. This often is necessary when converting an older bicycle to use a newer wheel with more sprockets. Spreading the forkends also puts them out of parallel.
This article describes how to check whether forkends are parallel, and how to adjust them.
This article describes adjustment of rear forkends, but the procedure is the same for a front fork.
Note, if you're not careful, you can do serious damage to your frame this way!
If your frame is made of aluminum or carbon fiber, do not attempt to re-space the frame: these materials are not suitable for "cold setting."
If in doubt, try the magnet test: if a magnet won't stick to it, don't try to re-space it!
Spreading the frame as described in the other article will cause a slight change in the angles of the forkends, so they will no longer be exactly parallel to one another (assuming they started that way.)
Moderate spacing changes make only small changes in the forkend angles. For instance, spreading a 120 mm frame to 126 mm only changes the angle by half a degree. Spreading a 126 mm frame to 130 only changes the angle by one-third of a degree.
Problems attributed to misaligned forkends include bent/broken axles. As it happens, the direction that the alignment changes when you spread the rear triangle is unlikely to cause this, because the stress it puts on the axle is opposite the stress created by the chain drive. Alignment errors in the opposite direction would be much more likely to cause problems.
Misaligned forkends do make it hard to install and secure the wheel, especially with a quick-release axle. With a higher-quality frame with forged forkends, or an internal-gear or sealed-bearing hub, misalignment is more likely to cause damage.
![]()
![]()
Alignment can be measured and corrected using professional tools - or a measuring tool made from an old hub axle and an adjustable wrench. Either way, you need full access to the forkends -- and so, remove fender bolts, derailer adapter claw, adjusters -- anything which gets in the way.
In any well-made bicycle, the ends of the forkend slots will be directly opposite one another. When the hub axle is all the way in, at the ends of the slots, a wheel should sit nicely centered in the frame between the chainstays. To check, use a properly-dished wheel, or if you aren't sure of the dishing, reverse the wheel right-to-left. It should then be just as far off-center, but to the opposite side.
Professional forkend alignment tools are supplied in pairs. These tools measure the alignment and also adjust it. You slide the tools all the way into the forkend slots, clamp the tools in place, and haul on them until the cups between the forkends face each other squarely.
Professional forkend alignment tools
![]()
When the cups between the forkends face one another squarely,
the forkends are correctly aligned. These forkends are very slightly misaligned.
Here's a link to a page giving some additional good advice:
![]()
![]()
I would advise, if in doubt about the alignment, that you take it to a shop for this purpose, even if you do the frame spreading yourself. It is possible, though, to measure and adjust forkend alignment using simple, improvised tools, if you are patient and skillful.
Your tools are a surplus hub axle with cones and locknuts (or axle end nuts), and a large adjustable wrench -- or a bench vise or large C-clamp. The axle needs to be long enough so the nuts will screw on outside the forkends, so a nut-type axle is preferable. Front and rear axles are of different diameters -- make sure you have the right one for the job.
To avoid bending thin forkends in the middle, a wrench needs to be large enough that its jaws reach across from the back of the forkends to where they attach to the stays -- at least a 12-inch adjustable wrench.
Check that the axle is straight by rolling it across a tabletop. Hacksaw the axle in half in the middle. Thread a bearing cone and locknut or axle nut onto each end. Do not tighten them against one another.
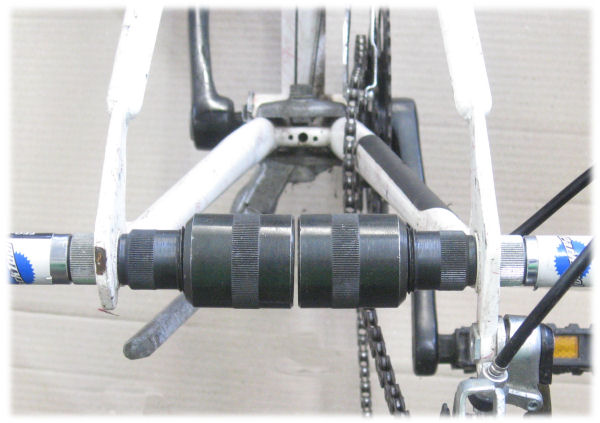
Slide each half of the axle all the way into the forkend slot, as far as it will go. As shown in the photo below, clamp the forkends finger tight between the nuts and cones, so the axle halves almost meet halfway between the forkends.
Measuring forkend alignment using a split hub axle.
These forkends are slightly splayed outward toward the rear.
When the forkends are correctly aligned, the axle halves will point directly toward each other, forming a straight line. If not, remove the measuring tool and realign the forkends.
Aligning a forkend using a large adjustable wrench.
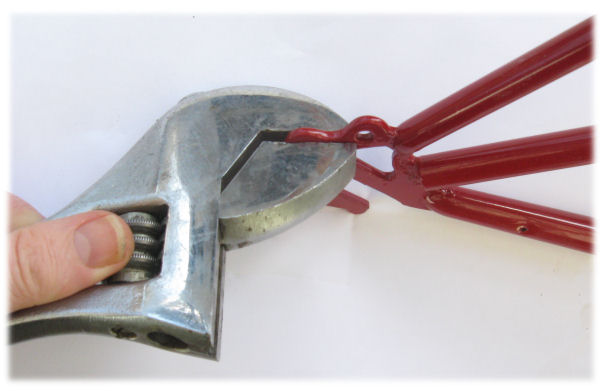
If the forkends are misaligned because you spread them apart, aim to bend the dropout along a line parallel to the bicycle's seat tube. Place wrench jaws over the upper part of the forkend, to avoid bending the upper and lower sides of the slot out of parallel. You can check their parallelism with a straightedge and align them, grasping the lower tang of the dropout with the adjustable wrench. Using a bench vise instead of an adjustable wrench makes it easier to grip the dropout close to the frame or fork -- but don't get so close that you risk damaging the connection. If using a vise, rest the frame on the bench so its weight can't bend the forkend. Work slowly and carefully: remember, you need only adjust the angle by one or two degrees, if that much.
Realigning the forkends will also slightly affect their spacing. To make it easiest to remove and replace the wheel, readjust the spacing. This adjustment is small -- the 2 x 4 method described on the other page will probably overcorrect. You might instead give the chainstay on each side a light whack with a rubber mallet. Target the chainstay, not the forkend, especially if it is the thin stamped-steel kind that bends easily. Test the alignment with the wheel that you are going to use. Ideally, it should slide smoothly into the forkends, but with no extra space.
![]()
![]()