Cone Adjustment

|


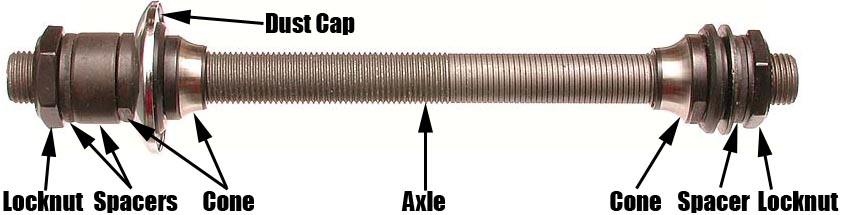
The vast majority of bicycle wheels use a type of hub known as "cup and cone", as shown on the right above. This type of hub is easy to service, but requires extremely careful adjustment to reduce friction and extend lifespan.
The cups are built into the shell of the hub; the cones are conical nuts that screw onto the axle. Steel balls roll between these two parts. The combination of cup, cone and balls forms the bearing; there is a bearing on each side of the hub.If the cones are screwed on too far, they exert pressure on the bearing balls. This causes excessive friction; the wheel will not turn as freely as it should, and the parts will wear out prematurely.
If the cones are not screwed on far enough, the bearings will have "play": the wheel will be able to shake back and forth on its bearings. This is an unpleasant sensation, and may cause control problems.
This adjustment is very critical; corrections on the order of 1/10 of a turn or less are needed to get the optimal adjustment.
Most cup-and-cone hubs use thin locknuts to secure the cones in place: the cone and it's locknut are tightened against one another, usually with a washer in between them. This keeps the cone from going out of adjustment. Variants:
Traditional, solid-axle hubs that are secured to the frame/fork by nuts need to be adjusted tight enough that play (sideways wiggle) is minimized, but loose enough to turn freely.
![]()
![]()
Quick-release hubs are trickier to adjust, because the quick-release mechanism compresses the axle slightly when it is tightened. If you adjust the cones so that they feel just right off the bike, they will bind up when you tighten the quick release. You must set the cones so that there is a little bit of play when the hub is off the bike, or when the wheel is installed with the quick release just barely tightened.
Many people undertighten quick release skewers. You can sort of get away with this, because most newer bikes have vertical dropouts in the rear, so the wheel won't slip forward under load. In the front, we have the execrable "lawyer lips" to defeat the purpose of the quick release. While lawyer lips will prevent a wheel from coming off it the quick release is loose, they don't prevent a loose wheel from wobbling, and they don't provide any protection at all if the skewer breaks.
To check your bearing adjustment, put the wheel into the bike with the quick release just barely tight enough to keep the wheel from falling out. If you are working on the rear wheel, take it out and re-install it so that the chain is not engaging the sprockets.
Try to wiggle the rim back-and-forth between the brake shoes; since the QR isn't tight, there should be a bit of play. If there is, hold the tire so that the valve is at the 3:00 or 9:00 position, then let go of it. On most wheels, the valve is the heaviest part; on wheels that have spoke reflectors, the reflector will be the heaviest part. Whatever is the heaviest part of the wheel, it should cause the wheel to turn and swing back and forth like a pendulum, before finally coming to a stop.
Once you have seen how the wheel turns with the quick release loose, try tightening the QR, then check again. If your bearing adjustment is correct, the play will disappear, but the wheel will turn as freely as it did when it was too loose. For very fine tuning of this, you can slightly vary the adjustment of the quick-release skewer, as long as it is good and snug.
Some high-performance wheels have a seam filler in the rim that weighs almost as much as the valve, so you may have to clip a clothespin or spoke wrench onto the wheel to artificially make a heavy spot. This may also be needed on wheels that have hubs with rubber contact seals, like many newer mountain-bike hubs.
This is not an issue in non-adjustable cartridge bearing hubs, such as Phil Wood. Adjustable cartridge bearing hubs should be adjusted under load -- easier on some than others.
![]()
![]()
The flats that let you turn the cones are usually quite shallow, so you will need at least one, preferably two special cone wrenches. Most front hubs require 13 mm cone wrenches, most rears take 15 mm. For most cyclists, the best choice is to buy double-ended cone wrenches with a 13 mm end and a 15 mm end. Park and Wheels Inc. make very good-quality double-ended cone wrenches. Cycle Pro and Bicycle Research brands are good for the home mechanic on a budget.
For shop use, single-ended cone wrenches with padded handles are more pleasant to work with. The current (laser cut) Park shop wrenches are quite good. I was not too pleased with the older stamped Park cone wrenches (shiny chrome finish).
Cone wrenches are very thin for their size, and should not be used for anything other than cones. Even when used properly, these are basically consumable tools, not a "lifetime investment" as with other wrenches from reputable manufacturers. My major hub tools are a pair of laser-cut 13 and 15 cone wrenches, which fit the vast majority of hubs, and a pair of 17 mm combination wrenches. To loosen a front hub, I put a 13 mm on each cone and back them apart, simultaneously tightening them against the locknuts. To tighten the hub, I use the two 17 mm wrenches on the locknuts. I rarely have to loosen the locknuts. This procedure is very fast, which is a good thing, considering how large a percentage of bikes have too-tight cones.
The same approach works for conventional rear hubs if the freewheel is off.
For cassette hubs, or conventional rear hubs that I want to adjust without removing the freewheel, I use a thin 15 mm wrench and the two 17's.
To loosen this type of hub, I usually do have to loosen the left locknut from its cone, loosen the cone, then re-tighten the locknut. To tighten it, the two 17's on the locknuts do the job quickly and easily.
The spacer bushing consists of an old, worn-out cone, with a short length of axle screwed into it, so it fits reasonably snugly onto the skewer. The quick-release body presses on this old cone; the stub of axle (which you can't see, because it is entirely inside the old cone) presses on the end of the axle. This tool is also useful for truing wheels if you use a truing stand, such as the Park, that doesn't compress the axle. This tool can remove the play from the bearings, and still allow you to install the wheel into the truing stand.
![]()
![]()
The quick check for rear bearings is to slowly backpedal with the bike off the ground. Depending on the degree of freeness of the freewheel, a properly adjusted wheel will either "pendulum" as a front wheel does, or, if the freewheel is a bit gooey, the wheel will turn backwards. If the wheel just sits there, the bearings are too tight (or the brake is rubbing!)
![]()
![]()
Last Updated: by Harriet Fell