Servicing Bicycle Headsets

|

revised by John "Balanced" Allen
The "headset" is the bearing assembly that connects the front fork to the frame, and permits the fork to turn for steering and balancing.
A headset consists of four races plus associated parts -- from top to bottom:
"Pressed" means that the parts are attached using an interference fit between cylindrical surfaces. The inside diameter of the outer part (head tube, crown race), is very slightly smaller than the outer diameter of the part which mates with it (head race, fork crown race seat). Force must be used to assemble (or disassemble) them. When assembled, they act as a single part.
Some newer headsets have slip-fit parts instead --- more about that later.
There are two common headset types: threaded and threadless.
Threaded HeadsetNote wrench flats on locknutand top threaded race. 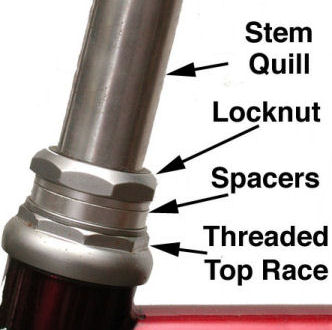 |
Threadless HeadsetNote pinch bolts on stem.and no wrench flats. 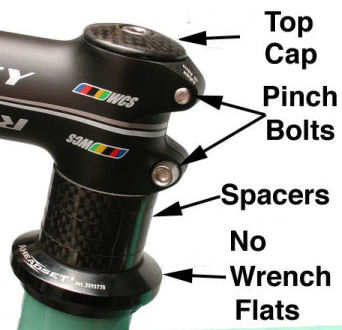 |
|---|
In addition to the keyed washer, there may also be one or more spacer washers. One of them may be extended forward to serve as the cable housing stop for a centerpull or cantilever brake or the mounting for a headlight.
Most bicycle frames don't care which style headset is used, as long as it is the correct size. For any given frame, you can usually switch back and forth between threaded and threadless by changing:
![]()
![]()
The vast majority of bikes with threaded headsets use the 1 inch size. A sizable minority uses the 1 1/8 inch size. Other sizes are generally quite rare. The illustrations below show how to tell the 1 inch size from the 1 1/8 inch size:
1 Inch threaded headset
|
1 1/8 Inch threaded headset
|
|---|
Other dimensions also matter when selecting a replacement headset.
Unless you are very sure about all of these dimensions, take the old headset and/or the frame and fork with you when you go to buy a new headset. Common dimensions are shown in the tables below. Better bike shops can mill a fork of most frames for a smaller crown-race press-fit diameter.
New bicycle designs and the increasing popularity of cartridge bearings have led to several new headset dimensional standards. The Standardized Headset Identification System (SHIS) has been developed by manufacturers to identify each of the dimensions that affect the fit of a headset to the bicycle frame and fork, using a compact code.
An upper or lower headset is usually interchangeable with another that has the same code: that is, they will fit the same frame and fork. The code does not indicate that mixing and matching parts within an upper or lower bearing assembly is possible. (One assembly might, for example, have cartridge bearings, and another, cup and cone bearings.)
The SHIS code works for headsets in common use today. It fails for a couple of older threaded headset standards which have dimensions a fraction of a millimeter different from current standards, but these are rare.
Here's an example of a SHIS code:
ZS44/28.6 | ZS44/30
The first half of the code (before the vertical bar) describes the upper headset. The second half describes the lower headset, as follows:
The first two letters of the code ("ZS" in the example) describe the headset assembly type. This can be different for the top and bottom assemblies.
| Examples of headset types | |
| External-cup (EC) lower headset. Semi-integrated (ZS) top headset -- note gap between bearing cup and cone just above the head tube. | Integrated (IS) headset, top and bottom. The bearing cone sits directly above the top of the head tube. No visible lower-headset parts. |
 |
 |
The number which follows the two letters (as in ZS44) gives the inner diameter of the head tube bore where the cup or bearing cartridge is inserted into it, rounded down to the nearest whole millimeter. Sometimes the diameter at the bottom is larger than at the top. Examples:
In each half of the code, the number following the forward slash, for example
ZS44/28.6 | ZS44/30
is the fork steerer outside diameter for the upper headset, and the fork crown race or bearing cartridge inside diameter for the lower headset, rounded to a whole number. If the steerer is threaded at other than the usual 24 TPI, this is also indicated, with the threading. For example, the code for a Nottingham Raleigh headset is
EC30/25.4-26tpi | EC30/26
The old Italian standard used a 26.5mm crown race, so the rounding could lead to some confusion -- but the Italian standard is obsolete, and an Italian fork can be milled down to 26.4 to take a modern ISO headset.
A threadless top race is slip fit onto the fork steerer. Even in an integrated headset whose cartridge bearings slip-fit directly into the head tube, the fork crown race is press fit. The cartridges, in turn, slip fit onto the crown race. Tapered contact surfaces between the cartridges and races prevent looseness.
Stack height (height of the upper or lower headset outside the head tube) is usually unimportant with threadless headsets, but it may optionally be listed for the upper and lower headset, as follows.
ZS44/28.6 H16 | ZS44/30 H 13.7
Also see the Park Tools page about the Standardized Headset Identification System
The tables below give the dimensions of common headset and steerer sizes, and some which are not so common. SHIS terms are given for threadless headsets, with many more types and sizes, so the codes really matter.
| Threadless Headsets/Steerers | |||||
|---|---|---|---|---|---|
| Stem I.D., Steerer O.D. |
SHIS term |
Frame Cup/ Cartridge Outside Diameter |
Crown race Inside diameter |
Notes | |
| 21.15 mm (0.833") |
EC32 | 32.7 mm | 26.4 mm | Used mainly on bicycles with one-piece cranks. BMX/O.P.C | |
| 1" (25.4 mm) |
IS38 | 38.0 mm | 26.4 mm | Slip fit, 36° angular contact at bottom of bore. | EC30 | 30.2 mm | 26.4 mm | This is the ISO standard 1" size. |
| 1 1/8" (28.6 mm) |
EC34 | 34.0 mm | 30.0 mm | Most newer mountain bikes with external cups use this size. | |
| IS41 | 41.0 mm | Integrated, angular contact, slip fit. | |||
| ZS41 | 41.3 mm | Low profile, press fit. May have cartridge or cup-and-cone bearings. | |||
| 41.6 mm | Integrated, angular contact. Obsolete. | ||||
| IS42 | 41.8 mm | Integrated angular contact; Campagnolo Hiddenset | |||
| 41.9-42.0 mm | Microtech integrated, press fit, square-bottomed recesses. Obsolete | ||||
| ZS44 | 44.0 mm | Retainer/loose balls or cartridge, which is slip fit into pressed cup | |||
| 44.0 mm | Integrated, 36° angular contact. Obsolete | ||||
| IS47 | 47.0 mm | Integrated lower only, slip fit. | |||
| Various | 52-56mm | Use crown race reducer | |||
| 1 1/4" (31.8 mm) |
EC37 | 37.0 mm | 33.0 mm | Mainly used on tandems | |
| 1.5" (38.1 mm) |
EC49, ZS49 |
49.7 mm | 39.8 mm | OnePointFive standard for downhill and freeride applications. Press fit | |
| 52 mm (2.05") |
IS52 | 52 mm | 39.8mm | Integrated lower headset. Slip fit. | |
| 55 mm (2.165) |
ZS55/40 | 55 mm | 39.8mm | Internal, press fit. | |
| 56 mm (2.21") |
EC56, ZS56 |
56 mm | 39.8mm | Internal or external, press fit. | |
Reader Jan Blaha has sent this information:
With some 1.5" lower assemblies that use cartridge bearings, it is possible to fit a 1-1/8" steerer using a crown race reducer, sold in the UK by Raleigh / RSP brand (RAT415 - please see attached photos) You have a frame that uses normally tapered 1-1/8" to 1.5" steerer (40mm crown race diameter) but you want to use a fork with a 1-1/8" straight steerer (30mm crown race diameter). The reducer replaces the original 40mm crown race of the headset. This reducer has outer diameter 51mm, thickness 5mm with 2.5mm deep seat and 45° angle - so compatibility depends on actual dimensions of the cup/bearing.
| bottom of crown-race reducer | top of crown-race reducer |

|
 |
Threaded Headsets/Steerers
|
||||||
|---|---|---|---|---|---|---|
| Standard | Frame Cup Outside Diameter |
Crown race Inside diameter |
Steerer O.D in mm | Threads Per inch |
Stem diameter, Steerer I.D. |
Notes |
| 1" J.I.S. |
30.0 mm | 27.0 mm | 25.4 mm | 24 | 22.2 mm (7/8") | Older or lower-quality bicycles from Asia. Can be milled to ISO standard. ISO and other 30.2 mm O.D.cups are a very tight fit into the head tube; best mill it to avoid damage. |
| 1" Raleigh |
30.0 mm | 27.0 mm | 25.4 mm | 26 | 22.2 mm (7/8") | Proprietary size used on Raleighs made in Nottingham, England. ISO and other 30.2 mm O.D, frame cups are a very tight fit into the head tube; best mill to avoid damage. |
| 1" ISO Standard |
30.2 mm | 26.4 mm |
25.4 mm |
24 | 22.2 mm (7/8") | This is the standard 1" size. |
| 1" Professional/ Campagnolo |
30.2 mm | 26.4 mm |
25.4 mm | 24 | 22.2 mm (7/8") | Obsolete. Threads are cut at 55 degrees, but an ISO headset can be used. |
| 1" Italian | 30.2 mm | 26.5 mm, 27.0 mm |
25.4 mm | 24 | 22.2 mm (7/8") | Obsolete. Threads are cut at 55 degrees, but an ISO or J.I.S. top headset can be used. Fork can be milled to ISO. |
| French | 30.2 mm | 26.5 mm, 27.0 mm |
25.0 mm | 25.4 (1 mm) |
22.0 mm | Obsolete. French steerers usually have a flat filed on the back, rather than a grooved keyway as with other threaded systems. The bottom headset parts wear faster; you can replace them with ISO parts and use the old top headset. |
| East German (DDR) | 30.6 mm | 26.8 mm (1 1/8") |
26 mm | 26 | 22.0 mm | Very similar to or the same as Austrian. 0.2 mm discrepancy may result from measuring the I.D. of the head tube (press fit). See page on German site. |
| Austrian |
30.8 mm | 26.7 mm | 26 mm | 25.4 (1 mm) |
22.0 mm | These are found on bicycles sold by Sears, made by Steyr in Austria. Higher quality Austrian bikes use English/ISO. |
| BMX/ O.P.C. bikes | 32.6 mm (varies) |
26.4 mm (varies) | 25.4 mm | 24 | 21.15 mm (.833") |
Used mainly on bicycles with one-piece cranks, also some early mountain bikes. |
| French Tandem | Let us know, if you do! | 28 mm | Let us now, if you do! | 25.4 (1 mm) |
22.0 mm | Obsolete and rare. |
| 1 1/8" | 34.0 mm | 30.0 mm | 28.6 mm | 26 | 25.4 mm (1") | "Oversized" (This size is more often used for threadless systems.) |
| Moulton | 30.2 mm top, 36.4 bottom |
33.0 mm | 25.4 mm | 24 | 22.2 mm (7/8") |
Moulton Mark III and earlier. Top headset is standard ISO. |
| 1 1/4" | 37.0 mm | 33.0 mm | 31.8 mm | 26 | 28.6 mm (1 1/8") | Mainly used on tandems |
![]()
![]()
It is a Very Bad Idea to install a threadless headset so the handlebar stem is supported by the threads of a threaded fork. The threaded section is not made to resist the stress from the stem and could break off, along with the stem and handlebars.
As already mentioned, it is at best risky to try to mix and match parts of a top or bottom headset. Even with the same SHIS code and similar appearance, there is no guarantee that internal parts will fit each other.
It is perfectly OK though to use a top and bottom headset of different makes, models and types, as long as the fit to the frame and fork is correct. For example, when replacing a threaded front fork with a threadless one, you could keep the bottom headset, if it fits and is in good condition.
You could cut off the threaded section of a fork steerer to use the fork with a threadless headset on a frame with a short head tube, though the fork's geometry may not produce optimal handling.
You can install a threadless headset on a threaded fork, if the fork steerer is tall enough and you use a quill stem. The threads should end above the headset top race. Use two locknuts tightened against each other to hold down the threadless top race, plus spacers as needed. In most cases, you'll have to grind away the inner lip of a top nut so you can thread it down past the top of the fork to serve as the second locknut. The Raleigh Twenty fork in the photo below already came with a second locknut for its original Nylon-sleeve-bearing top headset, and so no grinding was needed. More about this mod...

If the crown race is loose, sometimes you can fix it by using a hammer and centerpunch to create a series of "craters" in the side of the surface that locates the crown race. The raised edges of the craters may be just enough to remove the slop.
Or, better, you may go to a different size headset. In particular, if you are working with a J.I.S. frame and fork, they can be re-machined to work with an ISO headset. Since ISO. head tube races are larger, and crown races are smaller, there is material available to be machined away to convert to ISO.
You might also use "plastic steel" (epoxy glue with a filler of steel particles, available at hardware stores) to build up the space between a bearing race and its seat. Be sure to clean off the excess, so steel particles don't get into the bearing. Assemble and adjust the headset before the epoxy sets, so the races will seat fully. Threadlock compound may also work.
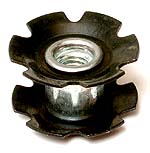
All of the other ball bearings on a bike spend their lives rotating round and round, but headsets spend most of their time pointing straight ahead. Sometimes you will see that the bearing balls have created a neat row of little dents in the bearing surface of the lower frame cup and/or the crown race. This creates the effect commonly known as "indexed steering" where the balls sort of "snap" into place, and the fork tends to stick in the straight-forward position.
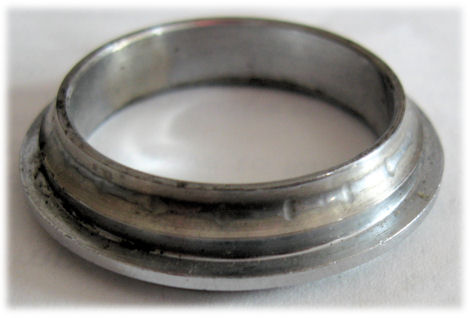
A "Brinelled" crown race (larger than actual size)
The dents in the races resemble the dents created by the Brinell hardness test procedure, and as a result, this type of damage is sometimes called "Brinelling." This is a bit of a misnomer, because the Brinell hardness test involves basically hammering a bearing ball into a metal sample with one good hard whack. Some folks assume that the dents in headset races also result from impact, but actually that is not commonly the case. Instead, it has to do with lubricant breakdown. Jobst Brandt has an article on this site describing the process in detail.
Ideally, a "Brinelled" headset should be replaced, but you can often cure the problem by replacing the retainer with loose balls. You use the same size balls, but can usually fit more of them into the races if you leave the retainer out. As a result, the greater number of balls, closer together, no longer all line up with the dimples in the races.
A headset race can, on the other hand, become indented due to overload in a crash. The dents then will be deeper in the part of the race that took the impact. Usually, in this case, the fork will be bent too. The indented race(s) and the fork need to be replaced.
![]()
![]()
The adjustable race is secured by either a:
Adjustment is easiest if you use two wrenches. You may use large end wrenches, or special wrenches made to fit the wrench flats of the locknut and top race -- but in a pinch, you can get by with a single large adjustable wrench. There is some risk of stripping out the tab of the keyed washer or of its damaging the threads of the steerer if you use a single wrench.
Older French threaded headsets use a serrated or pinned keyed washer which mates with the upper head race. With these headsets, you must back off the locknut farther so that you can rotate the upper head race.
 types of threadless headsets which adjust differently:
This type of headset must be used with a special handlebar stem that clamps onto the outside of the steerer, either with one or more binder bolts, or other means. The stem is further secured by a plastic or metal cap which is bolted to the star nut.
To adjust an "Aheadset"-type headset, the stem binder must be loosened, then the bolt that runs through the cap to the star nut is tightened, usually with a 5 mm Allen wrench. This presses the stem down against the tapered bushing that fits inside the adjustable cup, and takes up the slack in the system. The stem is then aligned with the front wheel and tightened with its binder bolts. Once the stem binder bolts have been tightened, the adjusting bolt that goes to the star nut is under no significant stress, and may even be removed. This makes some unusual customizations possible, for example, adding a wedge/expander-type stem to hold a second set of handlebars!
The upper collar has a gap at one point, with a binder bolt to squeeze the gap together. (This upper collar may also include a cable housing stop for the front brake, if the bicycle has a rigid fork and conventional cantilever or centerpull brakes.)
The handlebar stem is clamped tightly to the steerer, preventing the upper collar from moving upward. As the upper collar is compressed by the binder bolt, it squeezes the lower collar downward, taking up any slack in the headset bearings.
The GeForce is the only threadless headset which doesn't use the handlebar stem as part of the adjustment. This headset could be used with any stem, either external clamping or internal expander/wedge type. It is commonly found on Bike Friday folding bicycles made in the mid-1990s.
To adjust a GeForce headset, loosen the binder bolts in the collar and the top race; screw the collar and upper bearing race together, then back off by a fraction of a turn. Tighten the binder bolt of the collar while pressing the assembly down; turn the top race to adjust it; then tighten the binder bolt of the top race. The collar uses a 4 mm Allen wrench, and the top race, a 2.5 mm Allen wrench -- available at some bike shops and at better hardware and auto parts stores. You might take the collar/upper bearing race assembly with you to check the fit of this wrench when you buy it.
![]()
![]()
If you ride without a front fender in wet conditions, the front tire will spray filthy, gritty water right up into the lower race. (It is the lower race that supports your weight. Most headset failures occur at the lower race.)
To overhaul a headset, you first have to remove the stem. It usually also makes things easier if you remove the front fender, wheel and brake, or at least disconnect the front brake cable.
If you have a cyclecomputer pickup mounted on the fork, you'll also need to remove one end or the other of the computer wiring.
It helps also to turn the bike upside down once the stem has been removed -- easier with a workstand. Don't rest old upward-arched drop-bar brake cables on the floor.
Once you have the fork out of the frame, you can see what kind of bearings the headset uses. The illustrations below show the assembly order for typical headsets with different types of bearings. A headset may or may not have contact-type seals as shown under the lower bearing of the headset at the left. An integrated (IS) threadless headset with cartridge bearings does not have head-tube races, but instead, the cartridges install directly into recesses in the head tube of the frame.
| This threaded headset has bearing balls in cages (retainers), though generic loose bearing balls can be installed as replacements in most headsets which were supplied originally with retainers. | This threadless headset has cartridge bearings. Only exact replacement cartridges will work. Cartridge bearings are mostly to be found in newer, threadless headsets. |
 |
 |
| Images by keithonearth on Wikimedia Commons, reproduced under Gnu free documentation license | |
|---|---|
Once you have removed the fork, you can check the condition of cartridge bearings by turning them with your fingers. They should turn smoothly, though there will usually be some drag from bearing seals. Exact replacement is needed with cartridge bearings -- or else, replace the entire headset.
After cleaning a headset that uses retainers or loose bearing balls, check the bearing races for indentations and pitting.
If the headset uses bearing balls held in retainers, you could re-use them if they are still in good condition too. There's little standardization among different makes/models of headsets, so finding a replacement retainer may be difficult or impossible. The top and bottom retainer are usually identical, and exchanging them will increase wear life. It may be possible to pop the old bearing balls out of a retainer and insert new ones, taking care not to bend the retainer. You can increase the load capacity and wear life by replacing retainers (especially the bottom one) with loose bearing balls, though in some cases it's difficult to keep loose balls in place during reassembly.
If the headset had loose bearing balls, replace them...they're cheap enough! You very likely lost some anyway when you disassembled the headset. Most headsets use either the 5/32" or 3/16" size.
For re-assembly, it is very helpful to have the bike mounted upside down in a workstand.
If you lower the steerer partway into the head tube, you will be able to load up the bottom (but facing upward) head tube race with bearing balls without worrying about having them fall down through the head tube, because the steerer will fill the gap. Use enough grease to hold the bearing balls in place. Leave the race one ball short of full, so the balls won't jam up against each other when you reassemble the headset. Once all the bearing balls are in place, add lots more grease, to help seal out dirt when the bicycle is in use.
Once the balls are in place for the lower part of the headset, you can drop the fork down the rest of the way into the headset.
Grease the inside of the upper race, and get it started onto the steerer. Load it up with balls, add more grease, then slide (threadless) or screw (threaded) it "up" to take up most of the slack in the system, so the balls can't fall out.
For a threaded system, you can then turn the bike right-side up to complete assembly/adjustment and wipe off the excess grease.
For a threadless system, you need to secure the fork before turning the bike right-side up. I sometimes use an old toe strap for this, tying the fork crown to the down tube of the frame.
If you are working with an inexpensive all-steel headset, you can often manage with basic hand tools, but if your headset has aluminum or plastic parts, you really need specialized tools made for the purpose. These tools are generally not economical for a home mechanic to purchase, given how rarely they are likely to be used.
The following assumes you're working with an all-steel headset:
The head tube races usually come out pretty easily if you stick the old screwdriver down into the head tube until it hits the internal edge of the race. Tap gently once, then move the screwdriver to the opposite side of the head tube. Keep going back and forth every other blow, so that you won't be driving the race out crooked, which could damage the head tube.
The fork crown race is sometimes more challenging, depending on the construction of the fork crown and the width of the race. You may or may not be able to get a good purchase on the underside of the race.
If the race has a good overhang on both sides of the fork crown, a bench vise is often best for this. Open the vise just wide enough to permit the fork crown to fit through loosely, so that the crown race is sitting on top of the vise jaws. Use a mallet to rap on the top of the steerer, driving the fork down and away from the race. It is a good idea to thread the headset locknut onto the steerer before doing this, to prevent damage to the threads of the steerer.
Alternatively, a bicycle workstand can be used to clamp the steerer with the fork upside down. You can use the hammer and old screwdriver to drive off the race.
Some races and some fork crowns give very little to grab onto. There are special shop tools to work around this problem, so you might want to just bring the fork into your local shop and have it remove the race.
The head tube races can be tapped into place with a mallet and a block of soft wood that spreads the impact all the way around the margin. Use another block of wood to support the other end of the head tube, and be sure it's sitting level so you don't damage it. Bike shops have threaded tools to pull the races into place.
The fork crown race is more difficult to seat. You can tap on one side and the other, inboard next to the steerer with your old screwdriver, or you may tap on a length of pipe that just fits over the steerer. Turn the pipe around as you tap, in case the surface which rests against the crown race isn't perfectly level.
If you don't get the races firmly seated, they will seat themselves during riding, and the headset will loosen. It then only needs to be readjusted. If working on someone else's bicycle, you should be sure to get the races seated fully before delivering it. If you don't have special tools, you could go for a short, bumpy ride to seat the races, then readjust the headset.
![]()
![]()

