
Broadly speaking, dismantled Sturmey-Archer hubs are re-assembled by reversing the sequence of operations carried out when taking them to pieces. But it is more convenient to begin by first reconstructing certain minor combinations of components and then proceed to re-assemble the mechanism as a whole.
The methods of preparing some of these 'sub-assemblies' are less obvious than the processes by which they were taken apart, and as they apply equally to several hubs they are described here and not repeated in detail in the sub-sections devoted to the individual hubs.
The threaded driver (R507) and the 12-splined driver (K657) are no longer available. Hubs in which they were used must be converted by Installation the (HSA123) 3-splined driver and sprocket as a complete unit (including spacing washers and circlip).
[If the threaded driver is still good, any track sprocket will work with it -- or a freewheel may also be threaded onto it for hybrid gearing, but the freewheel must be locked. If it freewheels instead of the hub, the hub will not shift properly. As many as 4 sprockets may be used without complications. -- John Allen]
Driver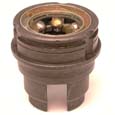 HSA123 |
Sprocket Dustcap HSL701 |
Sprocket Spacing Washer (2)  HMW127 |
Circlip (Snap ring)  HSL721 |
|---|
![]()
![]()
 Hold the planet cage in the left-hand, with flanges (in which the pawls fit) away from the body. Place a pawl between the flanges, with the flat top surface pointing towards the right, and insert a pawl pin through the outside flange and half-way through the pawl.
With tweezers or thin-nosed pliers* grip the bent leg of the pawl spring in the right hand and pass the spring along the side of the pawl until the loop of the spring is in line with the hole through the pawl and both legs of the spring are between the pawl and the planet cage. The pawl pin can now be pushed right in. It will enter the spring and keep it in position, and the bent leg of the pring will press against the pawl and so keep it projecting towards the right. If the job has been done correctly, the pawls will be pointing towards the right, with the flat surface uppermost, when the planet cage is held so that the dogs or pinion pins are facing the body.
*If tweezers are not available, the spring can be pushed into position with a small rod, about 1/8" in diameter. (It is easy after a little practice.)
 Hold the planet cage in the left hand with the flanges (in which the pawls fit) away from the body, or in the case of a TCW hold the planet cage pawl ring in the left hand, with the recess for the pawl pin heads towards the body.
Place a pawl between the flanges, with the flat top surface pointing towards the right but with the hole in the pawl to the left of the holes in the flanges.
Push a pawl pin through the hole in the inner flange and, with the thumb the left hand over the pin head, hold it in contact with the side of the pawl. With the right hand take the foot of the pawl spring between thumb and forefinger and thread the straight leg under the pawl pin from the rear and pull it forward until the loop of the spring encircles the pawl pin.
With a finger of the right hand, hold the foot of the spring under the nose of the pawl and, with a finger of the left hand, advance the pawl until the hole in it is in line with the holes in the flanges, and the pawl pin can be pushed home.
If the job has been done correctly the pawl will be pointing towards the right, with flat surface uppermost, when the planet cage is held so that the dogs are facing the body. The panel pin must now be riveted over lightly and without distorting the pin head, which may cause serious damage if it projects inwards and fouls the teeth of the planet pinions.
Support the pawl pin head on a piece of flat steel held in a vise (for the FW hub) or by means of a short steel rod (in the case of the FM hub). File off any projections caused by the riveting in the case of TCW because if the face is not smooth there will be unnecessary friction when the hub is in use.
![]()
![]()
 Place the gear ring, with the teeth downwards, on a flat surface. Place a pawl spring along the side of a pawl so that the loop is over the pin hole and the foot is under the long nose of the pawl. While holding a pawl pin ready in the left hand, grip the nose of the pawl and the foot of the spring-between the thumb and forefinger of the right hand and slide the pawl, tail first, between the flanges of the gear ring. When the hole in the pawl and the loop in the spring coincide with the holes in the flanges, push the pawl pin into position.
 First fit a pawl and pawl pin into the pawl ring and rivet the pawl pin into position. File the pawl-pin head so that it does not project beyond the face of the pawl ring. Turn the pawl back as far as it will go, and insert the tail of a spring between the pawl ring and the pawl pin, at the same time Installation the bent end of the spring under the outer end of the pawl. Then turn back the pawl to its correct position.
![]()
![]()
 The diagram alongside clearly illustrates the correct assembling of the brake shoes, but the following points should be specially noted: It is important that brake shoes are re-assembled with the side of the brake cam with the largest flat on the inside—towards the axle. (See letter 'A'of diagram.
To allow both brake shoes to be applied evenly the cam is slightly offset and if not fitted correctly will allow one shoe only to operate with consequent loss of braking efficiency. It is also important to ensure that the flange which carries the brake springs fits next to the brake arm plate. Brake shoe assemblies consist of the shoes with fulcrurn and springs. As two different types of fulcrum are in use a symbol number for each assembly is provided to ensure that they are correctly supplied.
were re-designed in 1951, and only the code number of the latest patterns are used in this catalogue. The original parts to which they correspond are:
![]()
![]()
Last Updated: by Harriet Fell