Steel Bicycle Frame Repairs

|

This article describes some ways to repair a steel front fork or frame well enough to get you rolling again, without access to professional tools.
A warning: Many of the techniques described here are for emergency repairs only, and should not be considered as permanent or completely safe fixes. These techniques require skill, and are not always successful. Attempts at repair can cause further damage. You use the techniques described here at your own risk.
But on the other hand, if you're stuck 100 miles, or 1000 miles, from a bike shop, the advantage may well outweigh the risk.
Steel is by far the preferred frame material for cyclists who tour into remote areas.
A steel frame usually bends first, giving a warning, rather than unexpectedly breaking apart.
A steel frame can be straightened (within limits) if bent, and still remain safe and strong. A welder anywhere in the world can perform a repair -- perhaps ugly, but safe -- on a steel frame which is damaged so it can't simply be straightened.
A steel frame can remain serviceable with dings, dents and scratches which render a carbon fiber frame unsafe to ride. Aluminum, titanium and carbon-fiber frames are much more difficult to repair, if they can be repaired at all.
My friend John Schubert takes a stand.
Sure, a steel frame may weigh a kilogram or so (a couple of pounds) more than a fancy carbon-fiber, aluminum-alloy or titanium frame. A bicycle designed to be durable and repairable might also have other components which are heavier -- but the difference has a minimal effect on travel time. The bicycle itself makes up only about 20% or less of the weight which the rider must propel up hills. The other 80% or more is the rider, -- possibly also baggage. Except when a bicycle is heavily loaded with baggage, the added weight will only slow a climb by only a few percent, if that. The difference is much less on level ground, where most power goes to fight aerodynamic drag. On downhills, a heavier bicycle is faster!
If you ride where a cell phone call will summon your spouse, a friend or a taxi, then feel free to enjoy the advantages of a lighter bicycle. It will have a different "feel" because of the lighter weight and because it transmits road roughness differently. (It could either feel rougher, like many fat-tube aluminum frames, or smoother, like most carbon fiber frames.) If you race, by all means, a lighter bicycle could get you across the finish line a few seconds earlier, and win the race. I am not ashamed to say that I have a Cannondale road racing bicycle for recreational riding.
But, if you ride far from home, and especially if you ride in places where replacing a bicycle frame would be time-consuming, difficult or expensive, go with steel. It is the choice of Bike Friday, Rivendell, Waterford and other companies which make high-grade touring bicycles.
Also see Sheldon's article on frame materials.
Now, onward to specific repairs.
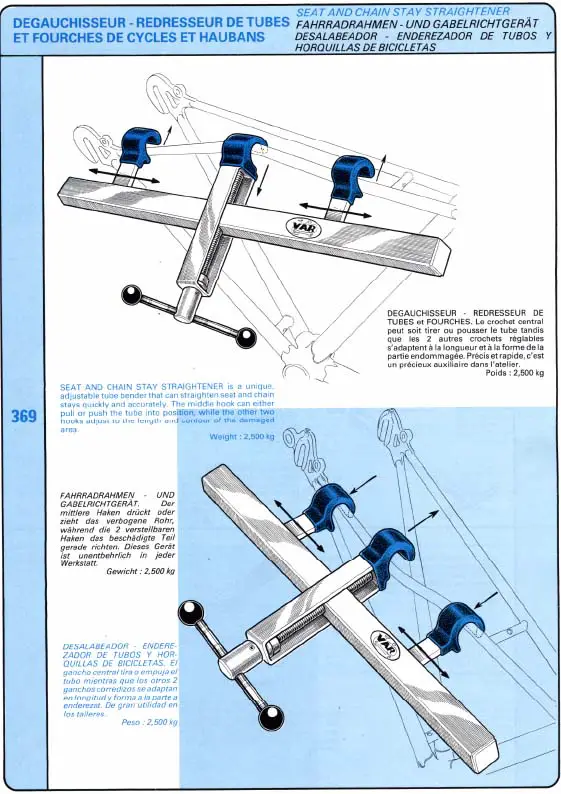
An understanding of how professional frame-alignment tools work can help you figure out how to perform a good alignment, or something close, with improvised tools. The image below, from an old Var tools catalog, shows a professional frame alignment table and fork alignment jig. Note: these tools are not for sale at Harris Cyclery, and some of them may no longer be manufactured by Var.
In the image below, note that:

The following comments apply to a bicycle with a steel frame and a rigid, steel front fork with blades that taper down from top to bottom; not a suspension fork. A moderately bent steel fork or frame can usually be straightened. A crumpled or cracked fork or frame can sometimes be made rideable with a welded or brazed reinforcement. The best repair, except in the case of slight, simple bends, is replacement -- but in case you can't...
A bicycle fork is not designed to withstand an impact from the front. A relatively light impact head-on into an obstacle -- a car, a fence -- which pushes against the front of the tire can bend a steel fork backward. The wheel takes the impact the same as the normal weight load, and often will be completely undamaged.
The fork blades will usually bend back below the fork crown, and the steerer tube will bend inside the head tube of the frame-- a hidden bend, but you can see that the lower headset races are no longer parallel. The headset bearings will probably be loose, or bind, depending on the angle at which you turn the fork.
If the fork is bent back, the bicycle's steering will be heavy, there may be toe clip overlap, and in extreme cases, the front wheel may interfere with the down tube. If the bend is that extreme, an emergency repair may not be the best idea...
A simple way to correct a rearward bend in a steel fork is to turn the fork around backward and slam the bicycle into a wall again -- but that may only further damage the frame, which may already have damage, just behind the head tube, making the head tube angle steeper. (An aluminum or carbon-fiber frame will more likely either be undamaged or break.)
There used to be a bike-shop tool which works like an automotive bumper jack. One end rests against the bicycle's bottom bracket and the other has a dummy axle to insert into the front fork's dropout slots, or a pipe which inserts into the head tube. You could improvise a tool like this with a borrowed automotive jack. You could straighten the fork and frame at the same time, though it is unlikely that everything will return precisely to its original position. Also, headset race seats may have become distorted, so the races are loose (see advice below), and bearing balls may have indented the races, causing "indexed" steering. Still, may be able to get the bicycle rideable again this way.
You could insert a pipe into the head tube, clamp it to something sturdy, and haul up on the rear of the frame by hand.
Moderate heat with a torch helps straighten ripples on the underside of the down tube and top tube, though you will damage the paint and -- unless you remove the paint first, make a sooty stench. Don't use enough heat to melt brazing. If the tubes are crumpled, you may need to braze or weld steel plates to reinforce the joints between the head tube and the other tubes, once alignment has been restored.
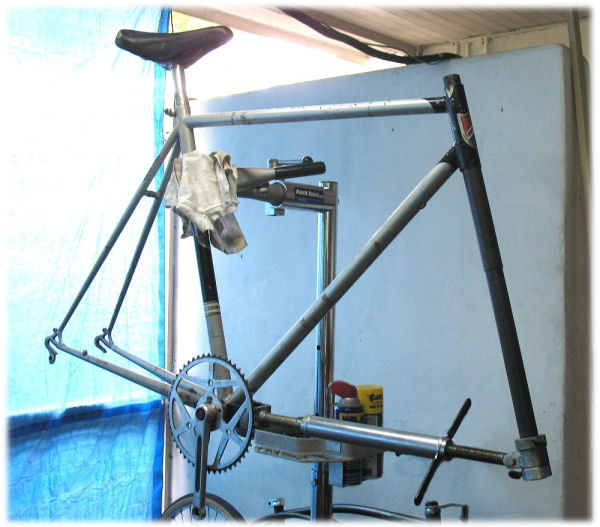
Park frame straightener (no longer sold). It is shown straightening only the
frame, without the fork.
Thanks to Kurt Kaminer for the photo.
If the steerer tube is bent, the headset bearings cannot be correctly adjusted. A more sophisticated fork repair is possible in a common metalworking shop, by removing the fork from the frame to straighten the steerer tube first, then the fork blades. First, remove the fork crown bearing race. You could clamp the fork crown between blocks of wood in the jaws of a bench vise, and use a heavy steel pipe which just fits over the steerer tube to straighten it until it is at a right angle to the shoulder of the crown race seat. One side of a carpenter's or machinist's square rests against the crown race seat, and the steerer tube is checked for parallelism with the other side. A metal ruler also may be used, with its end resting against the crown race seat. Lacking these tools, you just try to get the steerer as straight as you can.
The bend in the steerer tube will be partway up, just above the lower section which has thicker walls or an internal reinforcing sleeve. Slide the tube down as far as you can, so that its lower end rests on the reinforced lower end of the steerer tube and it straightens the bend rather than creating another bend.
The goal here is to get the headset bearing races parallel, so the headset bearing doesn't become looser or tighter as you turn the fork.
Check the steerer carefully for cracks. These will be most evident while you are applying force to bend the steerer.
After straightening the steerer tube, I rebent the fork blades with blows of a rubber mallet, checking that they were parallel and symmetrical around the extension of the steerer tube. Measurement is the most exacting part of this job. Bicycle framebuilders use a special gauge to align a fork, as shown in the image from the Var catalog, above. A picture of a homemade fork alignment jig is here . Alignment also can be checked by placing a wheel in the fork. The rim should sit equidistant from the fork blades, just under the fork crown. Turn the wheel around and try it both ways to check that it is centered, or take an average if it is not.
Also check that the dropouts are correctly aligned. A rough test of this may be made with the front hub. A hub with cup-and-cone bearings can still be functional with a bent axle and misaligned bearings. If the axle and dropouts have matching misalignment, but both appear intact otherwise, you could ride to the next bike shop at some small risk. Checking for dropout alignment is described in another file on this site.
Also see Jobst Brandt's comments on bent front forks. He describes a way to align fork blades which are bent to the side, without any tools other than your own hands and feet!
If the front wheel has landed heavily on a horizontal surface, the front fork may be bent forward. This is an extremely dangerous bend. With one hand on the handlebar, the steering will tend to weave because the feedback from the handlebar is abnormal. If both hands are removed, the front wheel will suddenly turn to the side, throwing you forward over the handlebars.
Usually, the frame will be undamaged. Because the intersection of lines extended from the down tube and head tube is more or less directly over the hub axle, a vertical impact does not produce large bending stresses on these tubes!
A fork also can be bent to the side, or one fork blade can be bent back more than the other so the wheel is tilted. If you ride through water, the wheel tracks of your bicycle should form a single line. If one tire track is off to the side of the other, the fork (and/or the frame, see below) is out of alignment. Then you have to lean to one side to keep the bicycle upright, if you can ride at all without hands on the handlebars. The tire may rub on a brake shoe or fork blade. And if the fork is bent to the side, the frame also may be twisted...
![]()
![]()
If a bicycle pulls to the side, the front and rear of the frame -- not only the fork -- should be checked. The bicycle will not track properly unless all of these parts are in alignment.
If the front triangle -- and front fork -- of a bicycle frame are aligned correctly, the front wheel will track in line with the rider.
Correct alignment of the rear triangle is also necessary to place the rider's weight directly over the wheels. If the rear triangle is aligned correctly, then the chainline at the cranks and at the rear hub will also agree, and the the chainwheel(s) and rear sprocket(s) will be parallel.
If all of the parts of the frame are in alignment, and the wheels are centered, it will be possible to ride the bicycle no-hands. That is the msot stringent test of a bicycle's alignment.
The front-triangle misalignment problems described below are in the order in which they need to be corrected, but the problems closer to the bottom of the list are more common. So, you may be able to do a quick check and skip several steps.
For the seat tube, down tube of top tube, you could drill out a wooden block to the same diameter as the tube, and saw it in half. Place one half against the side of the tube and tap it with a hammer, increasing force until the tube is straightened. Sheldon describes this technique in his article about his Raleigh International bicycle.
Here's another image from the Var catalog showing a tool to realign seatstays. This tool applies the opposing force to the seatstay either side of the bend, reducing the tendency to change dropout alignment. I've succeeded with a length of angle iron, wooden blocks to avoid scratching the paint, and C clamps. The dropout alignment should be checked anyway -- see below.
As described above, all parts of a bicycle frame should be aligned with reference to the bottom bracket shell.
Alignment starts with the seat tube. It is unusual for the seat tube to be bent, but if it is, it must be realigned first. To check, you could place a straightedge against the face of a chainwheel running upwards next to the seat tube. The straightedge should be equidistant from the top and bottom of the seat tube. Rotate the chainwheel 180 degrees, check again and take the average in case the chainwheel is canted. You could also place the straightedge along the side of the seat tube to check for a bend.
For the top end of the seat tube to be hauled to one or the other side, the bottom-bracket shell has to be clamped securely. Framebuilders do this work on an alignment table as shown above, but I have succeeded by clamping the faces of the bottom bracket shell firmly between wooden blocks in a big bench vise, inserting a pipe into the seat tube and pulling the pipe to the side.
Once you have removed the crankset to clamp the bottom-bracket shell, you can't use the chainwheel for measurement any more. But on the other hand, you will rarely find that the seat tube is bent.
The same procedure applies here as with the seat tube.
The front triangle of the frame may twisted so the head tube tilts slightly with relation to the seat tube.
Lacking a frame alignment table, you could stand in front of the bicycle and sight along the edge of the head tube to see whether it is parallel to the seat tube. Placing a straightedge alongside the head tube makes any twist easier to visualize.
Realignment is with a pipe inserted into the head tube, while holding the bottom bracket clamped. The top tube will tend to move more because its diameter is smaller. If you pull on the pipe above the top tube, you will tend to move the top tube sideways more; if you pull on the pipe below the down tube, the down tube more,. If you have already aligned the down tube, you want to make your adjustment at the top tube. The sideways adjustment to make the needed adjustment in the angle of the head tube is small, because the head tube is short, but you might want to go back and check the down tube and seat tube, just to be sure.
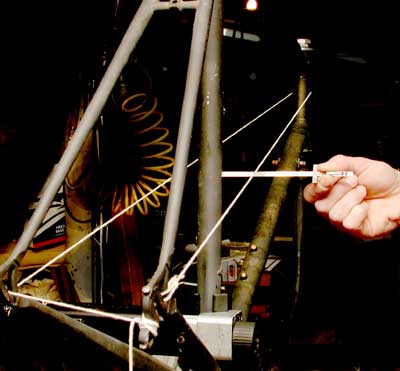
Testing and correcting alignment of the rear end of the frame is accomplished as described in the article on this site about frame spacing.
The you do this with a length of string, a ruler (or even only a stick where you can mark lengths) and a wooden plank.
Testing rear-triangle alignment with a string
Onward...
Moderate distortion of bearing seats so they no longer hold the bearing races in a press fit is easily fixed with "plastic steel" -- epoxy glue with embedded steel particles. Minor looseness can be addressed with blue threadlock compound. Either of these materials can be broken apart later by a blow to the bearing race, and scraped off, so a new race can be installed.
Before the material hardens, the headset should be adjusted, the bicycle ridden and the headset readjusted, so as to seat the races.
This is not necessarily only an emergency repair. I have performed it in the course of routine rebuilding.
It is sometimes possible with professional bicycle shop tools to mill the bearing seats to accept a different bearing race press-fit size.
Replace the fork, or if you can't::
This problem is most likely to occur when working on the bicycle and is much more likely with an aluminum-alloy frame than a steel one. The classic repair is to rethread the bottom-bracket shell to the Italian dimensional standard -- 1 mm larger in diameter than the others -- but this requires professional bike-shop tools and Italian-standard bottom-bracket parts. Some bottom-bracket shells do not have thick enough walls to allow the rethreading. A Velo Orange threadless bottom bracket offers another solution. If only one side is stripped, you could secure the bottom-bracket cup on that side with plastic steel -- same removal issue as with the headset locknut, only worse.
If the rear derailer gets caught in the spokes, the right rear dropout may be bent or broken. If it is only bent, it can usually be bent back into shape. Heat from a torch can make this job easier, but don't apply enough heat to melt brazed joints. For once, an aluminum frame may offer a simpler repair: the derailer hanger is often a bolt-on part.
If the derailer is pretzeled, the classic repair, is to shorten the chain and ride the bicycle as a singlespeed.
Don't worry about these. If you can access the inside of a tube, you could run a length of pipe (for example, a seatpost), into the tube to push out a dent. A professional framebuilder may use metal blocks, drilled out to the diameter of the tube and sawed in half, then clamped over the tube. Because the margins of the dent are raised, clamping the blocks down may push the dent out. Pressurized water inside a tube also could remove a dent, but that gets rather high-tech...
If a frame tube is crumpled, you might straighten it and then reinforce it. Brazed or welded steel plates can reinforce joints between tubes, once alignment has been restored. A welded or brazed-on reinforcement can splice the ends of a broken or crumpled tube.
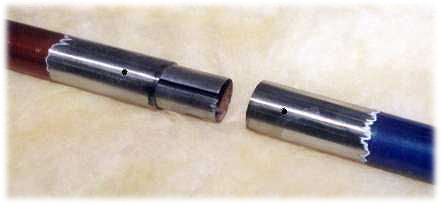
The image at the left shows a frame tube prepared for splicing. Paint has been sanded off either side of the joint. The inside of the tubes to be spliced also has been sanded clean. A length of tubing has been cut lengthwise so it can be compressed and slid into the spliced section as a reinforcement. Small holes have been drilled where brass can be applied and will flow into the joint.
 If you are far from a welding shop, you might splint a crumpled tube, for example with automotive hose clamps and a length of angle iron. The tube must still be able to take a load in tension, so a splint is reasonable if the tube is crumpled, but not broken. The tension and bending stresses on a chainstay, or any part of the front fork, do not allow of splinting and clamping, though I once did manage to ride home on my Raleigh Twenty with a right chainstay which had rusted out from the inside and broken. That was on a non-derailer bicycle and the chain held the chainstay together.
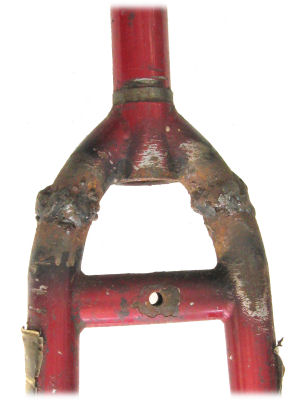
The image at the right shows an ugly but strong weld to the front fork of my wife's recumbent bicycle. If not for this repair, the plans for our bicycle tour would have been completely dashed. Another article tells the entire story.
A steel frame can be repaired by replacing a frame tube outright. This is sometimes done to restore a historic or valuable frame, but may also be done just to get a frame back on the road. A trashed frame can provide the needed material. I repaired the Raleigh Twenty frame I mentioned earlier by brazing in the chainstays and chainstay bridge from a trashed frame.
Maintaining correct dimensions is important in this work. With the Twenty, I left the seatstays and rear dropouts still in place, and I clamped a dummy rear axle into the dropouts to hold them in alignment.
![]()
![]()
Last Updated: by John Allen