Sheldon Brown's 1974 Brown Bicycle

|
Tweet
Follow @sheldonbrowncom |


In 1974 I found myself unemployed, as a result of a political purge at the Bicycle Repair Collective, and I was seriously considering going into business as a frame builder.I had some contacts in Chicago, including a then fairly active frame builder named Robert Myers, a former pupil of Albert Eisentraut. I was able to arrange to work in his shop for a couple of weeks on an apprenticeship basis, no money but I'd learn to build frames, and I'd also get to build a frame for myself.
As it turned out, this was a great stroke of luck for me, as I got to learn what hard, grimy work framebuilding was, and that it was not how i wanted to spend my time 40 hours a week!
To this day, the thought of a sandblasting booth gives me the willies!
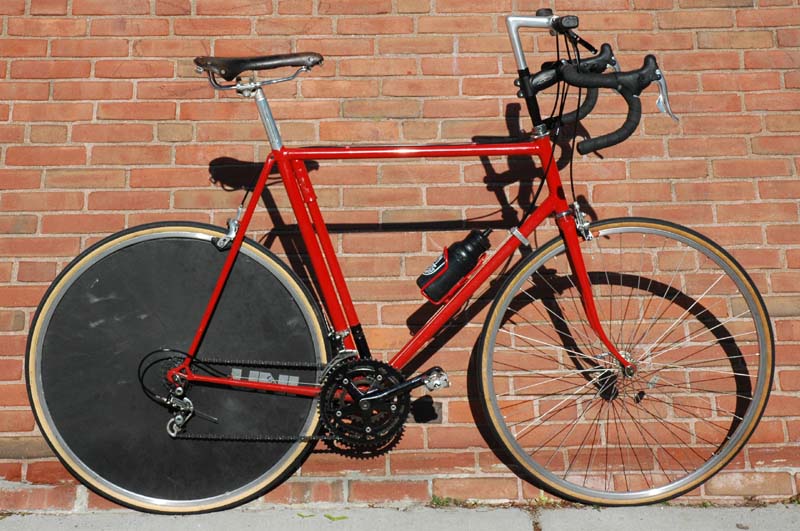
At the time, most of my experience was with British and French bikes, though I had also worked on a few Italian bikes, mainly Atalas, and Italianate Raleigh Professionals. I was very taken by the elegant simplicity of the lugwork on these bikes, a contrast to the ornate lugs that were beginning to go out of fashion. I decided the bike I'd build for myself would be a super-trick Italian style criterium racer.Rob was very helpful and gave great advice.
I wanted this frame to be super stiff, so I selected the heaviest gauge tubes that Rob had in stock. It is a mix of Reynolds 531 and Super Vitus tubing, I know longer remember which tubes are which.
![]()
![]()
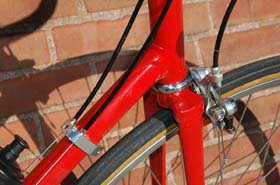
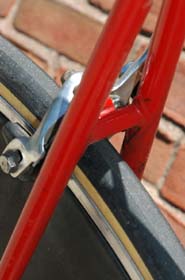
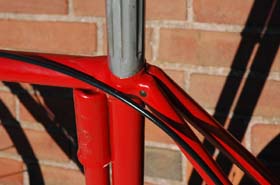
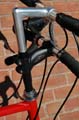
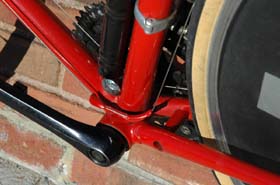
At the time, pretty much all bikes used external nut mounting for caliper brakes. If recessed brake bolts existed, they were distinctly newfangled, and I can't recall if I had ever seen any.My solution was to go one better, in any case: I bought a pair of Campagnolo center bolts and brazed them into the fork crown and seatstay bridge, cutting and filing the back edges smooth:
 |
 |
|---|
I couldn't afford actual Campagnolo brakes at the time, so I initially installed Weinmann calipers with Universal brake levers.In the late 1980s, these were replaced with Shimano SLR brakes. Getting those to work with the Campagnolo centerbolts was a bit of a challenge, since the Shimano calipers used a 7 mm bolt, vs the 6 mm Campagnolo bolts. I solved this problem by wrapping brass shim stock around the center bolts.
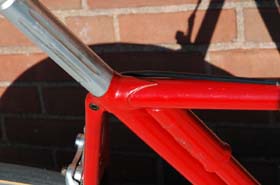
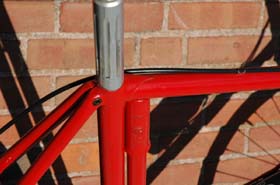
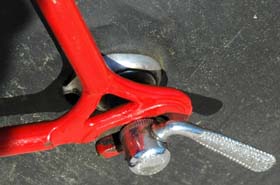
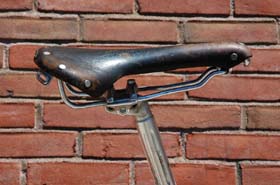
I had been very much taken with the "fastback" seat cluster of the Raleigh Professional and wished to do something similar on the Brown. This turned out to be a lot of work, and to use a LOT of silver! Underneath all of that is a fairly ordinary lug. The built-up silver is counterbored and drilled for a 1/4" - 28 socket head cap screw, also an innovation at the time.This is what is known somewhat scornfully among professional framebuilders as a "hundred hour frame" because I took the time to do a LOT of hand filing on it, time that would not be economically feasible in a commercial product.
 |
 |
 |
|---|
![]()
![]()
Another "trick" feature of this frame is the chainstay bridge, which runs all the way through both chainstays. Rob said this was arguably stronger than a conventional one, since the bridge was brazed to both the inside and the outside of each stay.There's a "spearpoint" reinforcement on the back of the seat tube. This is a piece cut from some scrap of frame tubing, welded on to the bottom bracket shell before brazing. It was probably the hardest part of the job, and didn't come out as elegant as I had hoped. The dropouts are classic Campagnolo 1010s with the fender mounts filed off (seemed like a good idea at the time!)
The front is radial spoked, heads in. I no longer believe that heads in is the best way to build a radial wheel, but that's how I used to do it.
![]()
![]()
Sometime in the late 1970s, I "T-boned" a Chevy that darted out of a driveway into my path while I was moving along at a pretty good clip. This was one of the worse crashes I've ever had, snapped off my two upper front teeth and bent the frame, fork and crank.I got crowns for my teeth, and straightened the fork and frame. (The seat tube had a 4 degree sideways bend just above the top of the spearpoint. I suspect that if it had not been for the spearpoint's reinforcement, the frame would have bent even farther, and been irreparable.
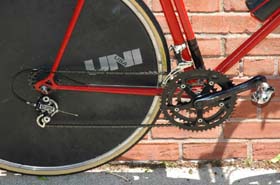
After the crash, I rebuilt the wheels using 630 mm (27 inch) Araya A20 rims, possibly the nicest rim ever made in that size. I'm still riding those.I converted to a triple using a black Sugino AP130 crankset, which I believe was the first ever 130/74 triple. I was thrilled when this became available, because it was the first time it became possible to use Biopace chainrings larger than 50 teeth on a triple! It has 52, 42 and 28 tooth biopace chainrings, which I've painted black to match the crank. I'm still using this crankset.
In 1984, I fell in love with the Shimano Dura-Ace SIS shift levers. The old SunTour units slipped all the time and had never been satisfactory. I wasn't convinced about indexing, but loved the feel of the Shimano levers, so I bought a pair, originally intending to use them in friction mode.
Once I had the indexing levers, however, I had to try to get indexing to work. I drilled out the housing stop of the SunTour Cyclone rear derailer, and tapped it to receive an adjusting barrel, in the hope that I might luck out and have a workable shifting system. Mirable dictu, it worked!
The short cage Cyclone can't handle the take up if I try to use the 28 tooth ring with any of the smaller rear sprockets, but I never have any occasion to use those gears anyway, so it works fine for me.
Most recently, further in the spirit of breaking the rules, I installed a set of Campagnolo Veloce 10-speed Ergo shifter...still with the 30 year old Cyclone and the 6-speed Regina Oro freewheel...and that works too!
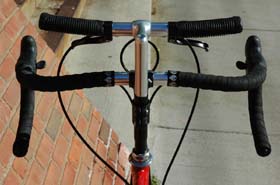
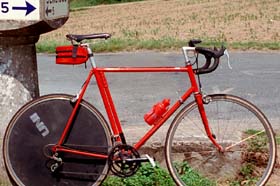
I started out with some rather deep Fiamme bars which got wrecked in the crash. Later I installed some nice Nitto bars and a Cinelli stem.That's what you see in the photo at the top of this page.
In the early '90s I switched to Scott AT-4 mountain bike bars, with DiaCompe SS5 brake levers, in an attempt to make this bike (which was originally built for speed, not for comfort) more comfortable. That was an improvement, but I found that I only rarely rode it, mainly because I was no longer happy reaching down to the down-tube shift levers. (This partly has to do with getting old and stiff and fat...I was up to 270 pounds or so for a while. Since then I've lost about 60 pounds thanks to the Atkins Diet...)
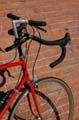
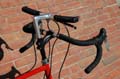
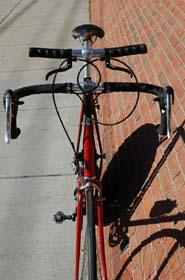
The latest incarnation of this bike is the most radical yet! As of May, 2004, It now has two, count 'em, two sets of handlebars!
This looks strange, but it turns out to be really pleasant to ride! The drop bars are a bit lower than I would normally be comfortable with, but a few inches above them is a second handlebar, a cut-down straight MTB bar. This gives me a couple of extra positions:
- Putting my hands on the grips gives me a sort-of cruiser-like "sit-up-and-beg" position which is a great relief when my wrists are starting to get sore.
This also turns out to be a very good position for seated climbing, because it puts more of my weight over my legs.
The handlebars are cut of quite short so as not to bump into my arms when I'm riding on the hoods. The resulting position, although I'm sitting up quite straight, is more aerodynamic than I would have expected, presumably due to the fact that my hands and arms are pretty close together.
- In addition, I can lean my forearms onto the upper bar in much the manner of an aero clip on. Although there aren't pads as with a typical aero bar, the higher position means that I don't lean that hard on them, and it's quite comfortable for reasonable periods of time.
 |
 |
 |
 |
 |
 |
![]()
![]()
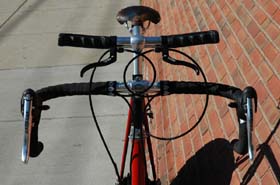
I like to ride pretty fast, but I don't feel comfortable with my hands too far from the brakes.
I've worked around this by installing a pair of Tektro "interrupter" levers on the upper handlebar. These levers are commonly marketed as "cyclocross" levers, intended to mount near the middle of a drop bar, but they work really well in this application too.
Normally, these levers would be set up with housing running along the top of the bar and into the outboard end of the lever body, with a second section of housing running down to the brake caliper. I tried that, but the cable routing was very awkward, so I reversed it.
In my installation, the housing runs from the drop bar lever under the tape then makes a smooth 180 degree bend to attach to the inboard side of the interrupter lever. Then a second section of housing run outward and downward to the calipers.
| |
|
 |
|
| |
|
 |
 |
 |
 |
 |
 |
Photos made with Nikon D70 w/18-70 lens, minor tweaking with Adobe Photoshop 7.0
May, 2004
![]()
![]()
Last Updated: by Harriet Fell