Reports of the demise of this Web site are greatly exaggerated! We at sheldonbrown.com thank Harris Cyclery for its support over the years. Harris Cyclery has closed, but we keep going. Keep visiting the site for new and updated articles, and news about possible new affilations.
Most commercial tandem cranksets are very similar, and rather expensive. Building up
your own crankset gives you a fine opportunity to try different ideas and save money. If you
know how to assemble and rebuild bicycle components, a tandem crankset isn't hard to
build. In fact, you can assemble a fine tandem crankset from solo-bike parts. You can even
build a tandem crankset from the leavings in bike shop spare parts bins. Parts for common cranksets are compatible across many brands and models.
On a tandem, cranksets with relatively large chainwheels are preferable to the newer
mountain bike cranksets with tiny chainwheels. The smaller the chainwheel and the slower the chain moves, the higher its tension and the more rapid the wear to
chain, chainwheels, sprockets and bearings. To the degree possible, use large rear
sprockets, not a tiny chainwheel, to get low gears on a tandem.
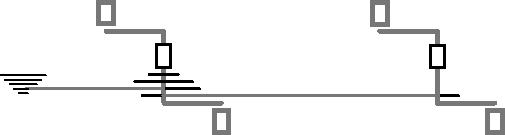
The simple way to build your own tandem crankset: single-side drive
Let's look first at the simplest way to assemble a tandem crankset: single-side
drive. This is illustrated below, looking down from the top of the tandem. The front
crankset is to the right in the picture, and the freewheel is to the left. Both chains are on
the right side of the tandem: the primary chain from the rear crankset to the rear
wheel, and the synchronizing chain which connects the two cranksets.
Single-side drive requires no special tandem parts. You use two ordinary
solo-bike cranksets. Because the chain tension from the front crankset is transferred
along the right side of the tandem through both chains, stresses on the bottom brackets
and cranks are no higher than in solo bike use. You can use almost any cranksets, except
the cheapest ones with the spider riveted onto the right crank. A single-side system is
light, too: only two (instead of three) of the tandem's four cranks have spiders, and the
bottom bracket spindles can be shorter on the left side.
It is usual to place the synchronizing chainwheel to the inside of a single primary chainwheel. That way, the right front crank is closer to the centerline of the bicycle, improving cornering clearance. With two primary chainwheels, the synchronizing chainwheel can be either on the inside or the outside, but it must be smaller than the nearer primary chainwheel. It may have to be very small if on the inside, increasing stress and wear. A triple crankset can allow the synchronizing chainwheel to be on the outside, where it need only be slightly smaller than the outer drive chainwheel -- with somewhat reduced cornering clearance.
But what if you would like to use triple primary chainwheels? It can be done! Modern wide-range front derailers require 10mm or more of clearance between the largest primary chainwheel and the right
crank. And the smallest chainwheel has its own, separate set of attachment bolts. For
these reasons, most modern triple cranksets let you install a fourth chainwheel at the
outside.
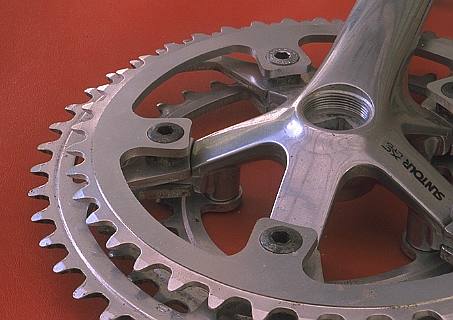
Common cranksets, like the one shown in the photograph below, use 110 mm and 74 mm bolt
circle diameters. Use a racing triple chainwheel bolt set (a special-order item from most
bike shops) to secure the synchronizing chainwheel to the spider along with the outer and
middle primary chainwheels. The long sleeve nuts of the bolt set should mount from the
inside, to secure the heavily-stressed primary chainwheels. For chain clearance, add a set of
thin washers to space the synchronizing chainwheel a bit extra far from the primary
chainwheel.
Right crank with four chainwheels for single-side drive The three outer chainwheels are attached using a racing triple bolt
set, with a thin washer in addition to the spacer
between the
outermost (synchronizing) and second (outer primary) chainwheels.
To clear the front derailer, your outboard synchronizing chainwheel
should be smaller than the largest primary chainwheel. Don't use a synchronizing
chainwheel of much less than 40 teeth, though, or it will wear quickly and is more likely to
interfere with the crank.
As the photo shows, the crank spider does not directly support the synchronizing
chainwheel if you are using four chainwheels. Use a chainwheel with recessed bolt holes, as shown, so the bolts will
position the chainwheel accurately and hold it securely. You may have to remove dropped-chain-catching pegs from chainwheels and/or the right
crank, but you won't miss them: the synchronizing chain takes their place.
So the synchronizing chain runs straight, preferably also place the single front chainwheel as far outboard as possible without the chain's interfering with the crank, so you can use a shorter bottom-bracket spindle. If you are using the same type of crankset at the front and four chainwheels at the rear, both bottom-bracket spindles will be the same. You might use a longer bottom bracket spindle instead, but this will reduce cornering clearance.
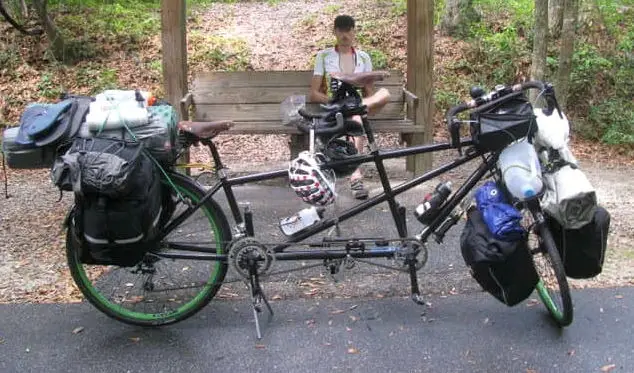
Thanks to Stu Giesecke for the photo of his tandem with single-side drive, synchronizing chainwheel on the outside. Says he: "I have ridden a same-side setup like this for thousands of miles. thanks, SB."
A crossover drive system lets you use triple primary chainwheels
without adding a fourth chainwheel to your drive crankset
A do-it-yourself crossover drive system
is more difficult to build than a single-side system. You must use a three-piece crankset for the primary crankset, so it can have chainwheels on both sides. Square-taper or ISIS cotterless cranks and bottom brackets are suitable and widely available.
Wrong-Brothers Cranks and Pedals
To build a crossover drive system with cranks made for solo bikes, you have to put right cranks on the left side of the bicycle, and a left crank on the right.
Left bicycle pedals are left-threaded so pedaling forces
tighten rather than unscrew them. For this reason, three of the four cranks in a tandem
crossover crankset are special. Two left-threaded cranks have chainwheels, and
one right-threaded crank has none.
Left-threaded pedals and cranks are reputedly an invention of the Wright brothers, bicycle
builders from Dayton, Ohio. (They also built airplanes). Using parts made for one side of
the bike on the other side makes your tandem team into Wrong brothers (and/or sisters),
but you can get away with it, thanks to thread-locking compound. Here's how:
You will need three right cranks and one left crank. Only a three-piece crankset (square-taper or ISIS) will work as the primary crankset, as the bottom bracket must be able to accept a crank with a chainwheel on both sides.
A crossover system stresses the cranks heavily. Most good mountain-bike
cranks, and many others, will work. Don't use cottered cranks
on the primary crankset with crossover drive.
You will need three right pedals
and two left pedals. If you can find left and right pedals identical except for the
threading (usually, double-sided pedals), you will need only one left pedal. Pedals made
for toeclips and straps are common in bike shop spare-parts bins, as many people have
traded these in for locking shoe-pedal systems. Toeclips and straps work well on a tandem, because you can bungee the pedals together to keep them upright..
If the left and right pedal shells are different, you will need to
rebuild two left pedal shells with right-threaded pedal spindles and one right pedal shell
with a left-threaded pedal spindle.
Secure the reverse-threaded pedals to the cranks with removable
thread-locking compound such as blue Loctite™. This is available at auto parts stores and
hardware stores. If you use steel cotterless cranks (sometimes found on older Fuji
bikes...) and a longpedal wrench such as the Park pedal wrench, you can get away
without using thread-locking compound, as long as you tighten the reverse-threaded pedals
extra-well. Some people, including a high-end tandem builder which will remain nameless
here, have converted crank threading using Helicoil™ threaded
inserts -- but the necessary enlarging of the pedal hole does weaken the crank
somewhat, and if you are going to all that trouble, you might as well just buy a
ready-made tandem crankset.
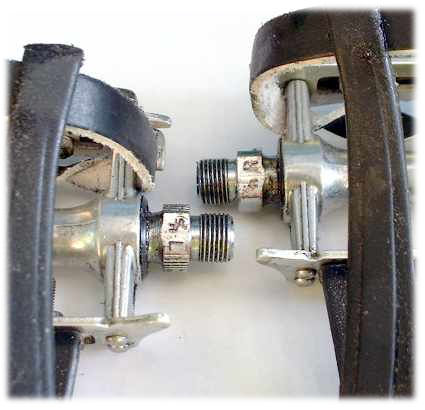
A pair of Wrong Bros. pedals -- right spindle in left pedal, left spindle
in right pedal.
Aligning the chainwheels is easiest if both cranks and bottom-bracket
axles are of the same make and model. If you don't, then be prepared to experiment with bottom
bracket axles and chainwheel spacers. Take extra care that the two left cranks are aligned
so the synchronizing chain will run straight. Remember, you will need at least one bottom
bracket axle with ample length on both ends for the primary crankset, which has
chainwheels on both sides. Many mountain-bike axles are long enough.
Use high-grade (racing quality) bottom bracket parts, especially in the
primary crankset. Its bottom bracket must withstand twice the usual stress. If using
cup-and-cone bottom brackets, use 11 loose bearing balls in each side rather than bearing
retainers, most of which have only 7 or 8 balls.
Check and recheck the crankbolts and bottom
brackets in your first few days of riding with the new crankset.
Advantages of crossover drive
Why go to all the trouble to build a crossover system, when single-side drive is so
much simpler? There are good reasons.
A crossover system is more conventional, if that's what appeals to you.
As long as all the cranks match, hardly anyone will notice that your crankset is a
do-it-yourself job. Very rarely, someone may stare at your bike and exclaim "That's a
new one for me, when did Shimagnolo ever made a tandem crankset in the 335SXL MTB
gruppo?" You could shrug your shoulders and smile, or else relieve this person's
curiosity with a detailed explanation. Who knows, it might be the beginning of a beautiful
friendship, and we tandemists do need friends to ride our tandems with us. (But be warned:
a person who asks obscure questions about bicycle parts may be either the local Shimagnolo sales rep, an
obsessive bike parts junkie, or both.)
A crossover system lets you use a kidback adapter with its chainwheel on
the left side. (You can, however, run a kidback's chain diagonally down to an additional
chainwheel on the right front crank of a single-side system. Turn the kidback upside down
to place its chainwheel on the right, use symmetrical pedals or exchange pedal spindles,
and Loctite™ the pedal threads of the kidback.)
The front crank spindle can be shorter than with single-side drive, improving cornering clearance. The front crankset needs more clearance, because it is farther from a wheel than the rear one,
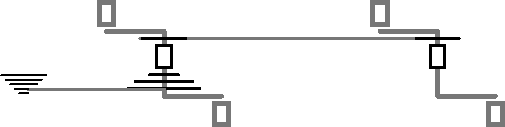
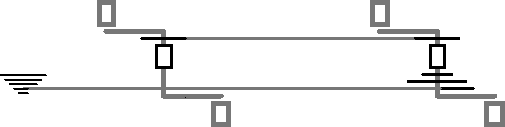
Front crossover drive
With crossover drive, you can use front
drive. Front drive makes a lot of sense on a road tandem. In front drive, the primary
chainwheels are on the front crankset, as shown here:
Front crossover drive
Synchronizing chain
|
v
^
|
Primary chain
Front drive has some important advantages:
You can use any chainwheel-sprocket combination without chain-angle
problems, since the long front chain reduces the angles.
The primary chain lasts longer, because the wear is spread among more
links, and so the sprockets also last longer.
Both riders can see and hear the front derailer.
Stresses on the bottom brackets and the frame are lower than with rear
crossover drive.
You can switch easily and quickly from the conventional rear crankset to
a kidback by using a chain that runs diagonally from the kidback down to the front
crankset, and lashing the conventional rear crankset to the frame so it does not turn. You
do not have to remove the rear pedals when switching to the kidback.
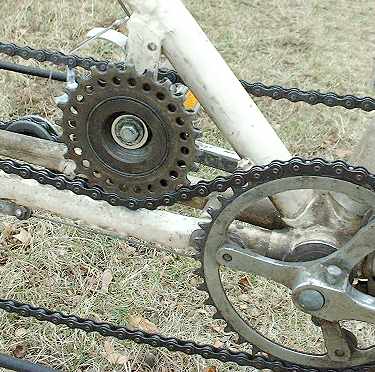
If you are building your own tandem frame and using an idler to adjust the synchronizing chain, the idler should be in the slack run of the chain to minimize drag. With front drive, the idler is then up inside the frame where it is well-supported and unlikely to be damaged. The idler shown is an old freewheel, with the pawls removed, bolted to a slotted steel bar.
There are disadvantages too:
Both sides of the bike have chains, making it more difficult to lift the
bike without getting chain dirt on yourself. The long primary chain may soil the rear seat tube.
There's more chain, and so the bike weighs a little more (but probably,
this is less important than the increase in drive efficiency due to smaller chain angles).
You have to make sure that the primary chain clears the right rear crank.
Generally, it will if the rear bottom bracket axle is as long as the front one.
If you ride over big bumps, the long primary chain can flop around. Front
drive doesn't make much sense for off-road riding. Even on a road tandem, it's a good idea
to put a chain idler just ahead of the rear bottom bracket to control the long, slack
lower run of the primary chain. But the need for an idler can become an advantage: a sprung,
two-pulley idler made from a rear derailer chain cage takes up chain, increasing
derailer capacity, and improves shifting.
Cornering clearance is reduced for the right front pedal. Whether this is a problem depends on the tandem's bottom-bracket height, crank length and pedal width.
I'll finish with another advantage: because all the gears are usable, front drive is
ideal for half-step gearing -- but that is a subject for another article.
Reports of the demise of this Web site are greatly exaggerated! We at sheldonbrown.com thank Harris Cyclery for its support over the years. Harris Cyclery has closed, but we keep going. Keep visiting the site for new and updated articles, and news about possible new affilations.