
Most newer bicycles use cartridge bottom brackets, which are modular assemblies. These are normally not adjustable or serviceable; rather, they are intended to be replaced as a unit when the bearings become worn out or contaminated.
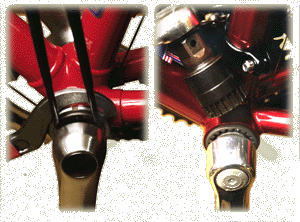
| An old-style cup-and-cone bottom bracket. The lockring wrench is about to loosen the lockring, the pin wrench is engaging two of the holes in the adjustable cup. (Some cartridge bearings do use these same tools.) Another article gives instructions on servicing cup-and-cone bottom brackets. |  |
A cartridge bottom bracket. The splined tool is shown above the bottom bracket. The crank would need to be removed to actually use the tool. |
This article deals with cartridge bottom brackets, and will provide advice on a number of different brands and models.
Cartridge bottom brackets are much cleaner and easier to work on than cup-and-cone bottom brackets -- grease and bearing balls are entirely enclosed inside the sealed cartridge(s).
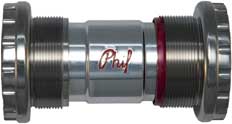
Our first, guiding example is a Phil Wood bottom bracket. Phil Wood was the first brand of cartridge bottom bracket, in 1971. It is more expensive than most others, but also has a very long service life -- and the bearings are replaceable at any well-equipped bicycle shop. Unlike most other brands, Phil Wood offers chainline adjustability. Installation is a bit more complicated for this reason. Phil Wood offers options tofit frames with newer outboard-bearing bottom brackets and all common threadings -- British/ISO, but also the older Italian, French, Swiss, Raleigh and Chater Lea threadings. (I've never even seen that one!) Phil Wood also offers two cartridge lengths and a large variety of axles. The instructions for Phil Wood bottom brackets below are helpful for many other brands and models as well.
![]()
![]()
This information is a supplement to the instructions on the Phil Wood site. This information is for a square-aper spindle in a traidional threaded bottom-bracket shell. Information for other types is also on the Phil Wood web site.
| Phil Wood cartridge | Phil Wood mounting rings |
 |
 |
See Sheldon's bottom-bracket crib sheet for information on dimensions. The Phil Wood 68 mm cartridge works with most bicycles, but the 73 mm cartridge must be used with a wide bottom bracket shell, as on some mountain bikes and the Raleigh Twenty. If you use a narrow cartridge with these bicycles, the mounting rings may go in too far and engage partially-cut threads inside the bottom-bracket shell. The mounting rings may not engage the cartridge fully, or the threads may compress the mounting rings and cartridge, resulting in difficult installation and accelerated bearing wear.
To avoid corrosion, different bottom-bracket shell materials require different mounting-ring materials, as indicated on the Phil Wwood site.
If you are not sure of the threading of the bottom bracket shell, measure it with a thread-pitch gauge or by trying to thread in bottom-bracket cups or mounting rings with known threading. The correct size will start and turn easily. Do not try to force a fit, or you will damage the frame.
Phil Wood has special, wider mounting ring and lockring for use with a Shimano E-type front derailer, which attaches with a ring clamped under the flange of a right-side bottom bracket cup.
![]()
![]()
Phil Wood sells a pro mounting-ring tool, with a handle, and a portable/consumer tool. Park sells an even fancier tool for Phil Wood mounting rings. Phil Wood instructions recommend using two pro tools so you can easily turn both mounting rings at the same time. Still, one portable/consumer tool will do the job.You need a 22 mm wrench (or a 7/8 inch wrench, which is very slightly larger), or a large adjustable wrench to turn the portable/consumer tool.
| Phil Wood consumer tool | Phil Wood pro tools |

|

|
Unless your bicycle's cranks have extractor crankbolts, you also may need a crank remover, even for a new installation. You may need a rubber mallet to tap a mounting-ring tool into engagement, or to dislodge a mounting ring, and a hand-held grinder to remove projections inside the frame.
After removing one mounting ring, the other will usually remain attached to the cartridge. If the cartridge came out with it, remove the mounting ring that is still inside the bottom bracket, then reinsert the mounting ring and cartridge into the frame. Attaching a crank to the free end of the axle and wiggle it around to loosen the cartridge from the remaining mounting ring. Then, if necessary, tap lightly on the end of the axle to push the cartridge out of the mounting ring .
Before installing the bottom bracket, the threading inside the frame must be clean. You may need to scrape old threadlock compound out with a tap or thread gauge. Clean the threads thoroughly with solvent and let them dry.
Insert the cartridge so the "Phil" label in the middle reads correctly from riding position on the bicycle. Get both mounting rings started by hand, then tighten them down.
With all modern frames, and with older English-, Raleigh- and Swiss-threaded frames, the right-hand mounting ring is left-threaded -- so you can easily tighten one mounting ring at a time. As that mounting ring tries to turn the cartridge, it will tighten the opposite mounting ring, which is threaded the opposite way. You can adjust the chainline by using the tool alternately on one side and then the other.
With French and Italian threaded frames, both sides are right-threaded, and tightening one mounting ring may tend to unscrew the other. The entire assembly will then migrate toward the other side of the bicycle, and one or both mounting rings may not slide all the way onto the end of the cartridge. You may have to make an allowance for this in checking the fit.
With a right-and-left-threaded frame, or if you have two tools, spread threadlock compound on the threads of both mounting rings and place a couple of drops on the threads inside the frame, too. You usually will only need to use half the threadlock compound which Phil Wood supplies. You will then have enough remaining for reinstallation if that is necessary.
If the frame is right-threaded on both sides and you can't get both mounting rings to engage the cartridge fully, reinsert the right-hand mounting ring, this time with threadlock compound, and let it cure. Threadlock compound hardens when no longer exposed to air. That may take a few hours. Then install the left-hand mounting ring.
Finally, install the cranks and check alignment again. Unless you have allowed the threadlock compound on one side to cure, you can easily readjust the chainline now.
Blue threadlock compound still allows the parts to be unthreaded in case you ever need to readjust the chainline or remove the assembly.
![]()
![]()
Several other manufacturers make cartridge bottom brackets.
Most of the bottom-brackets described below are available only for ISO/British bottom-bracket threading, but there are a couple which can work with other threadings or if a bottom-bracket shell has damaged threads. Some are designed for new and/or proprietary bottom-bracket shell designs. There are seven main types of cartridge bottom bracket assemblies,
I can't cover installation of all of these in detail here, but I can describe them well enough to help you choose the right one. Park Tool provides good general instructions on removal and installation of the more common types, and instructions are supplied with each new bottom bracket. Links to additional information accompany the descriptions of the different types, below.
None use the same tool as Phil Wood, though some are very similar and look as though they should work. The phil wod tool has 18 splines; the common Simano tool, 20.

![]()
![]()

SKF bottom-brackets are of high quality and are of this type. They are especially suitable for tandems and heavy riders. The tradeoff is that they are heavier than many other cartridge bottom brackets.


Velo Orange sells a clever cartridge bottom bracket with expanding sleeves that press against the inside of a bottom bracket shell with damaged threads. This cartridge will work with all common threading standards except Italian, whose threads have a larger diameter than the others.

Some bottom brackets use no full-width cartridges, because the bearings are press-fit directly into the bicycle frame. This approach was never very common -- there is the risk that repeated installation and removal may enlarge the bearing seats in the frame, loosening the fit. On the other hand, dimensions of sealed bearings are well-standardized, so it is possible to purchase replacement sealed bearing units from any good bearing supplier. Any good machine shop can press bearings in and out of a frame. Klein used special tools to service press-fit bearings -- see the Klein technical manual; there is a photo essay on extracting a Klein bottom bracket here. Phil Wood makes an outboard bearing assembly (see next item in this list) which presses in where the inboard Klein bearings went and avoids further wear to the frame. Merlin information also is online (look at bottom of page). Also see BB30 information and information from Park Tool on several varieties of bottom brackets.
These are common with newer cranks, and thread into the frame same as other bottom brackets, only the bearings are outside the ends of the bottom bracket shell, making it possible to use a large-diameter hollow axle for greater stiffness and lighter weight.
Park Tool has good instructions online for this complicated and finicky bottom-bracket installation. The alignment of the threads is critical, as the bearings at the right and left sides are not aligned to each other by a cartridge.
Phil Wood sells outboard-bearing assemblies that fit every bottom-bracket threading and Klein press-in bottom brackets, making it possible to retrofit outboard-bearing cranks onto an older frame. Different manufacturers use different spline patterns to fit the crank to the axle. Phil Wood bottom brackets work with Shimano cranks and others that have the same dimensions, though not all that use outboard bearings and in particular, not Campagnolo. Though the Phil Wood assembly is sold in the Raleigh 26 TPI threading, it probably will not work with the long (76mm) bottom bracket shell of the Raleigh Twenty, Tourist and Chopper. See information on the Phil Wood site.

These tighten into the frame without using the frame threads, and avoid the finicky alignment issues with other outboard bearing assemblies. The Pressfit 30 design (with a 30 mm axle) is a relatively new development as of 2010, from Truvativ (SRAM). Abandoning threading and using a larger (46 mm) bottom-bracket shell makes for better compatibility with carbon-fiber frames. More information.

![]()
![]()
Last Updated: by Harriet Fell